Search the Community
Showing results for tags 'tutorial'.
Found 5 results
-
 This tutorial will teach you how to create a Renegade FDS from zero with every single detail you need. I'll describe every detail I know in this tutorial. 1- Download Renegade FDS First of all, you need FDS binaries. You can download the stock FDS binaries below. You need this before TT patch else server will not function. In the 3rd step of the installation, choose Configure Renegade Server for GameSpy. If you want to use XWIS, you need to install TT patch first, because settings will be overwritten. When you're done with installation, you'll need to install the TT patch now. 2- Download TT Patch TT patch adds a lot of features, fixes and improvements to both Game and FDS. I strongly recommend you to install it. To download the TT patch for server, you need to visit https://www.tiberiantechnologies.org/downloads. You should download the "The Tiberian Technologies server files - 4.x" from the page, under title "The Tiberian Technologies server files". After downloading the zip file, open it and you'll see "serverfiles" folder. Extract everything in it to your server folder, overwrite existing files. At this point, you have a fully working FDS with basic features in. You can download plugins for SSGM by clicking here. Put the plugins in your server folder and enable them in ssgm.ini. Under [Plugins] section, add a line with plugin's full file name and a following 1. Example: "YourPluginFile.dll=1" Optionally, you can install an advanced server side manager which is called Dragonade, by Whitedragon. Dragonade adds a lot of features like advanced kill messages, it's own Gamespy broadcaster, vehicle queue and more. I'll detail more in the next title. If you don't want to install Dragonade, jump to 4th step. 3- Download Dragonade Dragonade is an advanced server side game manager made by Whitedragon, adding countless features to game, console and scripts development. You can find the latest Dragonade releases from this GitHub repository: https://github.com/TheUnstoppable/Dragonade/releases After you download it, extract the contents of "Server" folder to your server folder, overwrite existing files. Congratulations, now you have a fully functional server with advanced features in. You can install Dragonade supported plugins by clicking here. Put the plugins in your server folder and enable them in da.ini. Under [Plugins] section, add a line with plugin's full file name and a following 1. Example: "YourPluginFile.dll=1" All SSGM plugins are compatible with Dragonade as well so you can add them in da.ini too and you don't need to delete them. Next step, you need to configure your server. 4- Configure FDS • If you didn't installed Dragonade, you can configure your server from ssgm.ini. • If you installed Dragonade, you can configure your server's core features from da.ini, crates from da_crates.ini. You can also use gamemode specific features from da_<gamemode name>.ini, every option from da.ini works in here as well. If you have Dragonade or not, you must go to ssgm.ini and da.ini (if exists) and change your Port (for ssgm.ini) and LogPort (for da.ini) to something else except 7025. This is a very sensitive port which everyone can read your server console and execute commands freely. If you want to leave it 7025; well, you've been warned. Make sure both values match if you're using Dragonade. If you want to use XWIS instead, you can fill in the required options in server.ini, if you want to use GameSpy: • If you don't have Dragonade, set the GameType to GameSpy. • If you have Dragonade, set GameType to LAN (LAN option forces your game port to 4848) then in da.ini, set EnableGameSpy option to 1. (You can also set GameType to WOL if you want to list your server both in XWIS and GSA) If you want to host your server both on GameSpy and XWIS, you will need Dragonade. Or you can use GameSpy plugin of BRenBot, in 8th step. BRenBot's GameSpy plugin is not recommended for use as it's not giving enough information about server, compared to Dragonade. • "server.ini" file also lets you to choose few options for gameplay. • "svrcfg_cnc.ini" in Data folder lets you change your server name, max players, message of the day, and basic information. Every option in all configurations are self-explaining, reading comments should be enough to understand their operation, if you have any questions, ask them in comments. • "tt.cfg" is where you should put your rotation and/or game definitions. A tutorial to install maps and content pack is detailed on 5th and/or 6th step(s). 7th step will guide you to add your content packs and maps in rotation. 5- Install maps TT uses a new system called TTFS, which supports clients to download maps from in-game while joining a server, or in background while playing (if enabled). Create a folder in your server folder, and put your maps in the folder, for example "mapfiles". Do not put your maps in Data folder! There are 2 ways to convert and install your maps: You can convert and install your maps and packages using command line, TT wiki explains it briefly at https://www.tiberiantechnologies.org/wiki/index.php?title=Resource_manager_documentation#PackageEditor. Assuming your maps in your "mapfiles" folder, open a Command Prompt, browse to your server folder, and type the following command: packageeditor convert "mapfiles\YourMapName.mix" <Version (Example: "1.0")> <Author (Example: "Westwood")> You don't have to put actual author's name for Author, but it's preferred to put map owner's nick or your server's name. After that, you will get a response from application like this: Package was saved to 'C:\Your\Server\Renegade\FDS\ttfs/packages/01234567.tpi'. You can now install it via 'packageeditor install 01234567'. You should do what the message tells you to do. packageeditor install 01234567 You can use a UI wrapper for PackageEditor.exe created by me. You can download it by clicking here. Do not replace the executable with your server's PackageEditor.exe. It's purpose is to execute commands from PackageEditor.exe and keep the operations user friendly, not replace it. After this you can delete the maps you converted to save from space. If you need the MIX files, you can convert your maps to MIX files back using ttfs2mix, available here. If you want to create a server content pack to add features like chat sounds, custom models, replacements, modifications, jump to the next step; if you don't want to, jump to 7th step for "tt.cfg" guide. 6- Create a server content pack For this step, we will use a tool called XCC Mixer, included in XCC Utilities from XWIS. You can download XCC Utilities from here. After downloading XCC Utilities, copy a random Mix file from your game, server or wherever you want and rename it whatever you want (do not prefix your content pack's name with "C&C_"). Then, open it with XCC Mixer and clear everything in it by selecting all with Ctrl+A and Delete key. Now you can add whatever you want in your content pack. You can find a lot of modifications from here and here, you can also add custom MP3 or WAV sounds and musics to use with chat sounds or jukebox (7th step for Jukebox). If your modification modifies presets, don't forget to include the "objects.ddb" in your content pack. Otherwise your modifications to presets will not work. Loading up your modifications will be detailed in 7th step. After you're done with your content pack, install it like a map just like in 5th step. Put your content pack into "mapfiles" folder, and execute the same commands to install it. You can create as many as content packs you want, there is no limitage as far as I know. After this you can delete the content pack you converted to save from space. If you need the content pack again, you can convert it to MIX file back using ttfs2mix, available here. If you want to update your content pack, you need to delete old one using the following command: packageeditor uninstall <Name of your content pack's MIX file (example: if mix file name is "ContentPack.mix", type "ContentPack")> And then, you can install new one like a normal map. Now, proceed to 7th step for "tt.cfg" guide. 7- Configure rotation TT uses a new method to define rotation. Compared to svrcfg_cnc.ini, this rotation structure allows you to define game definitions (for example, custom preset databases and content packs) and a location to let clients know where to download maps. Typically, a tt.cfg file should look like this: gameDefinitions: { }; rotation: [ "C&C_Field" ]; downloader: { repositoryUrl = "http://ttfs.ultraaow.com"; }; If you have any content packs installed and you want to use them, you will need to add game definitions first. Game definitions are maps with extra dependencies. Game definitions allows clients to install more than 1 mix files for a single map. This is a useful case for modders and server owners to keep stuff organized. And in our case, which is content packs, you can add every asset you want into server without modifying map files. Creating game definitions are easy: YourMapName: { mapName = "C&C_YourMapName"; packages = ["C&C_YourMapName", "YourContentPack"]; serverPresetsFile = "objects.ddb"; }; This is the structure of a game definition. You should replace "YourMapName" with the map name you want, and "YourContentPack" to your content pack. So if you want to install "C&C_Field", with a content pack named "MyServerContent" with no custom presets file, game definition should look like: Field: { mapName = "C&C_Field"; packages = ["C&C_Field", "MyServerContent"]; }; If you have a custom presets file and want to use it instead of default objects.ddb, first you need to move your preset file in Data folder, and give it a different name or extension. (Changing extension name is generally preferred, and the example below takes a custom preset file named "objects.aow") Then you should add an option to load your custom presets file for the game definition, like so: Field: { mapName = "C&C_Field"; packages = ["C&C_Field", "MyServerContent"]; serverPresetsFile = "objects.aow"; }; You can have as many preset file as you want to use with game definitions, but since each server content can have only 1 objects.ddb file, you may need to create multiple content packs containing your custom presets file. And finally, you need to add game definitions you created under gameDefinitions section, and "YourMapName" under rotation section like this: (I also added C&C_Canyon for example) gameDefinitions: { Field: { mapName = "C&C_Field"; packages = ["C&C_Field", "MyServerContent"]; serverPresetsFile = "objects.aow"; }; Canyon: { mapName = "C&C_Canyon"; packages = ["C&C_Canyon", "MyServerContent"]; }; }; rotation: [ "Field", "Canyon" ]; downloader: { repositoryUrl = "http://ttfs.ultraaow.com"; }; If you don't want/have a content pack, add the full map name to directly rotation section like this: gameDefinitions: { }; rotation: [ "C&C_Field", "C&C_Canyon" ]; downloader: { repositoryUrl = "http://ttfs.ultraaow.com"; }; The TTFS URL "http://ttfs.ultraaow.com" is obsolete and no longer maintained, if you don't know how to host your TTFS to let clients install your maps and content pack, please read the "Create your own TTFS server" at the final step. 8- Install a bot/regulator This setup is optional and is not required, but it's recommended to have a server regulator. If you don't want to install a bot, skip this step. You may need a fast and pratic way to regulate and moderate your server, here comes IRC bots for your help. There are really a lot of options, but I'm going to detail the most popular one BRenBot. Since it's original website at new.brenbot.com is down, there is BRenBot repository at http://gitlab.com/danpaul88/brenbot. There is an auto-builder when the repository gets updated. You can view all builds at here. Click the latest "passed" job, and then in the sidebar at right, click "Download". After downloading it, extract it to a folder like "brenbot" in your server folder. Before running it, configure your bot. It's self-explained as well as other configurations. You can use the IRC server intended for C&C games, at "irc.cncirc.net" for your server. Even though it's website is down, there are still several plugins available such as Jukebox, Status Reporter, Ping, Seen, etc. from here and here. All you need to do is putting ".pm", ".xml" files in plugins folder. If you're experiencing issues while getting your moderator/administrator powers with BRenBot, make sure the option called "Moderators_Force_Auth" in brenbot.cfg is 0. If you want to leave it 1, you have to register your nick. To do that join your IRC channel, type /query <your bot name> (or right click your bot, and choose "Query", "Message", "Page", or any other option to private message), and use !help command to find out the right command to register your ingame name to bot. Once you do that, you will need to authenticate yourself either: • Paging /Host, using !auth command like "!auth <your password>", • Page your server if it is XWIS, using !auth like "!auth <your password>", • Use !auth command in admin channel of your bot, like "!auth <your ingame name>". 9- Final touches Your server is now ready a double-click away to run! If you need to open ports, follow these steps: Open "server.ini" configuration, if your GameType is not LAN, open the Port value in configuration on UDP. If your GameType is LAN, open 4848 port on UDP. If you are hosting your game on GameSpy using Dragonade (GameType is LAN) : In "da.ini", open the GameSpyQueryPort value in configuration on UDP. If you are hosting your game on GameSpy without Dragonade (GameType is GameSpy) : In "server.ini", open the GameSpyGamePort and GameSpyQueryPort, both on UDP. If you need to read your console or send commands to your server externally, or you have a remote control utility for your server, in "server.ini", open RemoteAdminPort on UDP. Only open this port if you need remote access to your FDS console using RenRem. This is NOT recommended, but if you need to access your SSGM Log Port server, open the Port value in "ssgm.ini", on TCP. This port is extremely vulnerable, do not open this port if you don't know what you're doing. If you don't have a server to host TTFS packages, or you don't know how, follow this tutorial: https://multiplayerforums.com/topic/8660-create-your-own-ttfs-server/ If nobody can connect your server after port forwarding, try following this tutorial: https://multiplayerforums.com/topic/8739-nobody-can-join-your-server-check-your-firewall/ Steps below is only valid for residental lines. Some ISPs around the world uses the system below. If you are using a VPS/VDS provider, this probably not the case. But if you still believe issue is because your VPS/VDS provider, consider getting in touch with them. If you want to host a *public* server on a residental line, think twice and move to a VPS/VDS ASAP. If you want to host the server to play with friends/clan/group, that should be fine. If firewall tutorial didn't help too and tools like https://www.portchecktool.com/ says your ports are closed, you might be in a Carrier-Grade NAT (CGN) network. If you're in CGN, you'll have trouble hosting servers and you'll need to contact your ISP to assign you a static IP. You can read more about what is a CGN, and how to check you're in from https://help.edovia.com/hc/en-us/articles/115012824927-Carrier-Grade-NAT-Large-Scale-NAT. If you have the CGN issue, don't worry yet. If you have a valid serial, hosting the server on WOL often makes it possible to host the server through the CGN and it does not require you to open your ports and tweak the firewall. But, only the people using the in-game server listing can join your server. You made it, enjoy in your server! If you have any questions, or you think I missed something, let me know in comments.
 -
So you try and set up a gamespy renegade server but you see this then in your searchbar in the start menu or next to it type notepad %systemroot%/system32/drivers/etc/hosts right click notepad %systemroot%/system32/drivers/etc/hosts and click run as administrator and click yes on thebox that pops up now copy this text (one line at a a time) below: 162.248.88.129 master.gamespy.com 162.248.88.129 master.udpsoft.com and paste it into the file the file should look something like this now save the file and close the window now type restart in the server console window and it should look like this now(you may have to restart your pc) and if you look in renlist you should see your server this proves i dont have to use brenbot for my server to work properly
-
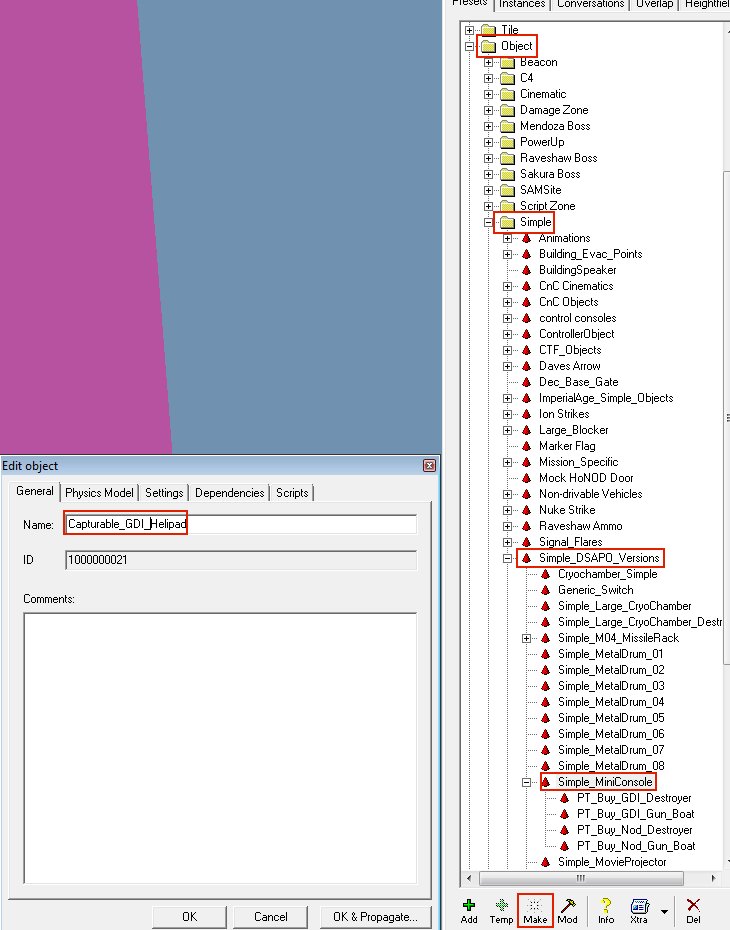
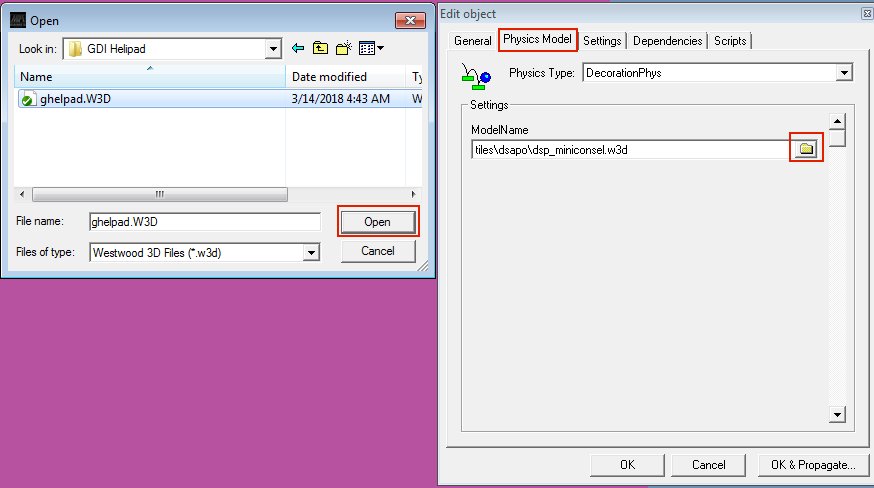
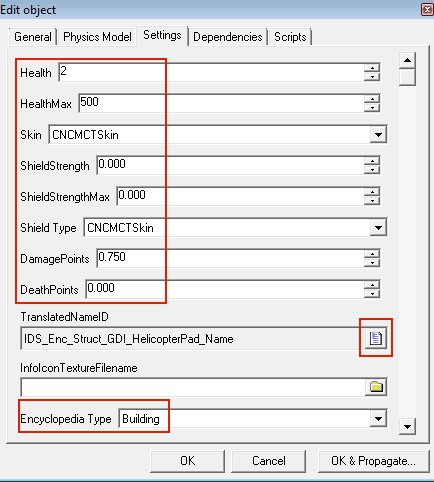
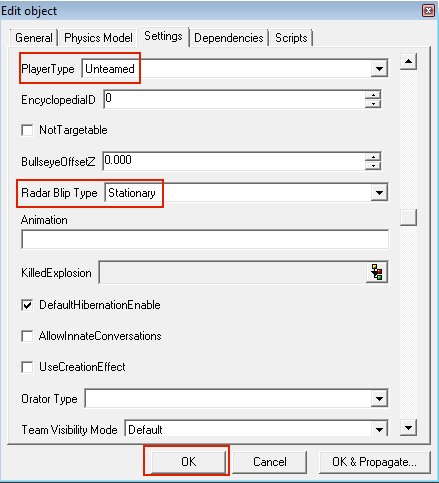
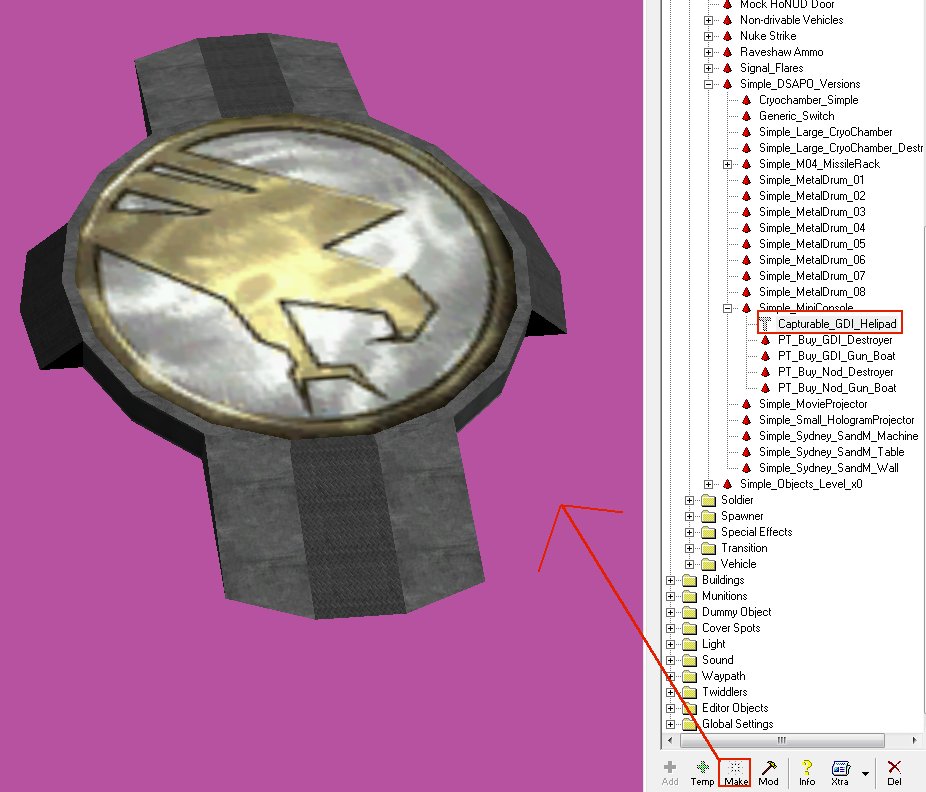
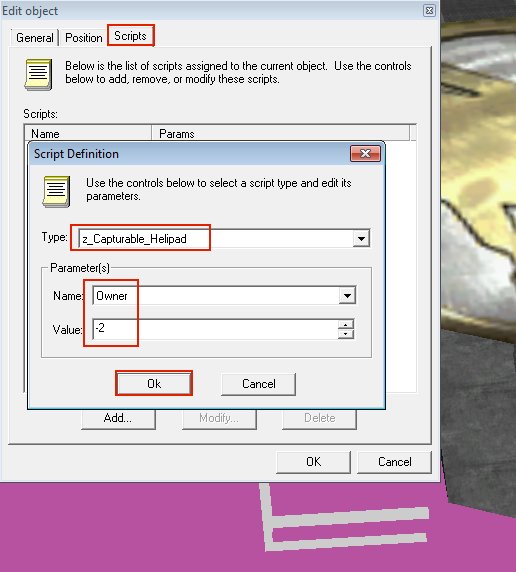
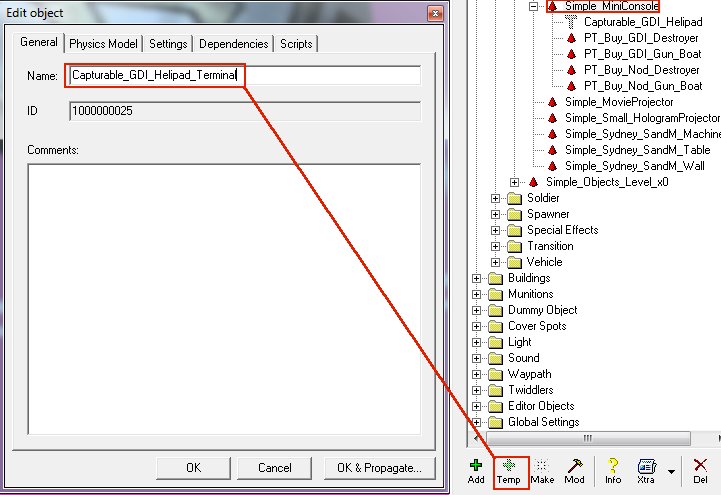
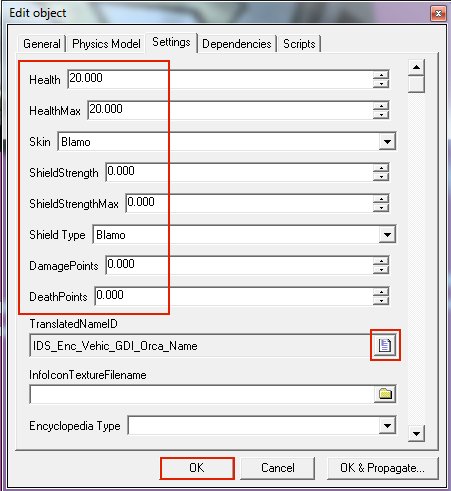
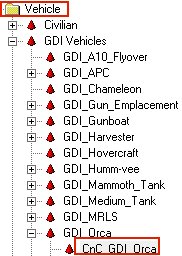
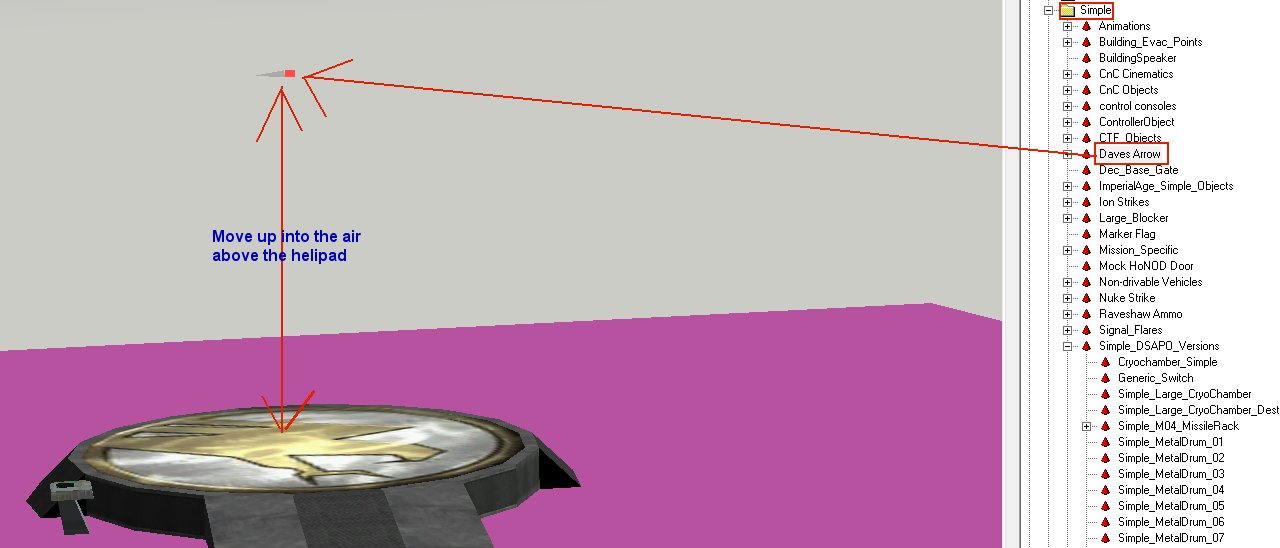
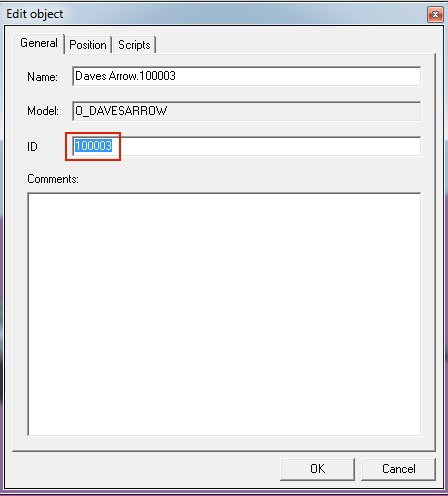
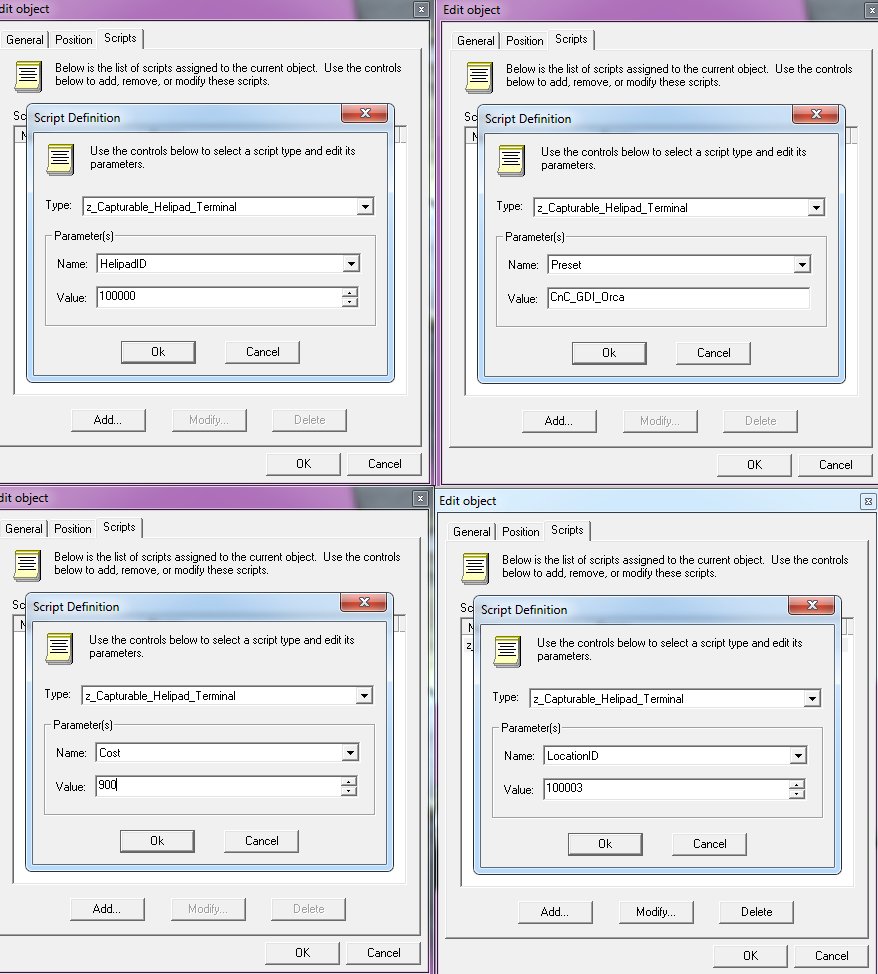
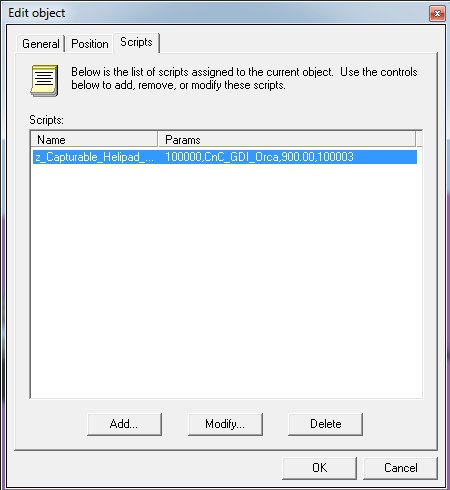
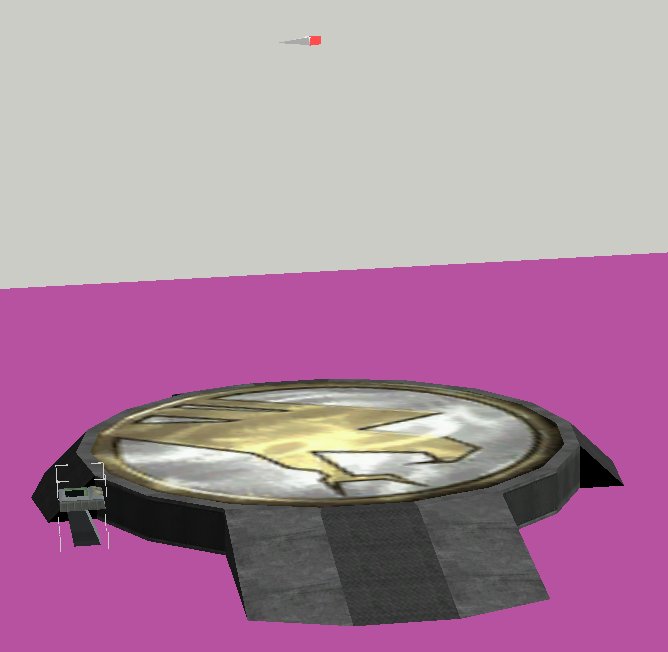
The Helipad models and textures are in zip: CapturableHelipads.zip Temp Object->Simple->Simple_DSAPO_Versions->Simple_MiniConsole and name it Capturable_GDI_Helipad On the Physics Model tab browse for the model by clicking the folder icon and choose Open On the Settings tab set Health to 2 and HealthMax to 500, Skin and ShieldType both to CNCMCTSkin with a DamagePoints of 0.750 and DeathPoints 0.000 Click the Letter icon to choose the Helipad name from the category Enc and set Encyclopedia Type to Building Still on the Settings tab set PlayerType to Unteamed and Radar Blip Type to Stationary Now MAKE your Helipad on the map Goto the Scripts tab for the properties of the Helipad and select Type: z_Capturable_Helipad and set the Name Parameter of Owner to -2 Now note the ID of the Helipad in a textfile for later use: Now TEMP the Simple_MiniConsole and name it Capturable_GDI_Helipad_Terminal On the Settings tab for the Terminal set the Skin and Shield Type to Blamo and Damage and Deathpoints to 0.000 We want this Terminal to grant a Orca so we click the Letter icon and choose the Orca name from Enc category: Make note of the GDI Orca exact multiplayer presetname, in our case this would be the original preset aka CnC_GDI_Orca (case sensitive): Next we MAKE and position a Daves Arrow on TOP of the Helipad and move it UP on the Z-axis until it floats like 3 orca's high in the air above the Helipad like so: Note the ID of this Arrow (PS: Do NOT delete the arrow, you must leave it on the map) Go back to the Helipad Terminal on the map and goto its properties and the Scripts Tab, add the following script to it "z_Capturable_Helipad_Terminal" with the settings as displayed below. HelipadID would be the ID of the Helipad on the map we created first, in this example ID number 100000 Preset would be the vehicle to create at the location of the Daves Arrow we placed so CnC_GDI_Orca and 100003 An Orca costs $900 in Renegade so we enter that as the Cost for it. Endresult should look like this for the Helipad Terminal: You're done:

- 2 replies
-
- 1
-

-
- renhelp.net
- zunnie
- (and 5 more)
-
- Introduction - To run a Renegade Dedicated Server you need to install the Renegade FDS (Renegade Free Dedicated Server). A dedicated server is basically a command prompt type program which allows for Renegade Clients to connect and play on the server. Dedicated servers are usually unattended and you cannot play as the host while running a dedicated server. Running a dedicated server also enables you to run SSGM 4.0 and/or other special modifications which are unavailable for the game client. - MPF Public FDS Package - You can now download a prepared package of the FDS with DA 1.92 and TT 4.6 applied, source code included with examples @ - Downloads - You can download the RenegadeFDS installation file on for example multiplayerforums over here: http://multiplayerforums.com/index.php?/files/file/8-renegade-fds-1037zip/ - Installation - After you have installed the Renegade FDS, copy the contents of the serverfiles folder from the 4.0 server download into the FDS folder. Edit server.ini, svrcfg_cnc.ini, tt.cfg and ssgm.ini as per the documentation in this topic. You then also need to install the Visual C++ runtime libraries and the DirectX runtimes from the "redist" folder. The server.exe file in the 4.1 server download is the one you should be using as it has been modified. You do not need to apply the "no gameplay pending" patch to it as that patch is now a server.ini option. Make sure anticheat.ini is in the data folder otherwise the anti-cheat will probably kick you even with stock renegade files. - Requirements - When running the server in Westwood Online Mode (or XWIS these days) you require a valid serial number to run the server. This can be a FDS Serial or your Renegade Client serial. In GameSpy mode there are no requirements. - Notes for WOL Mode (XWIS) - To get passed the WOL installation for the RenegadeFDS you need to enter a (fake) serial number that starts with 0669. For example: 0669714956637887900319 ( Note: This is a fake serial and you cannot host a server in XWIS/WOL mode with this serial, it is only provided for you so you can get passed the installation dialogs. )
-
Please review the video tutorial here on how to post When submitting a new tutorial please follow this simple guide to keep tutorials concise and provide the best learning experience. When you post a new topic, it will need to be approved by a moderator. Some things to think about Only post releases of Renegade related tutorials in the their correct catagoryAdd a category tag before the title, to do this add a tag with one of the common tags and click on ' use first tag as prefix ' then create a [ ] containing the main format and provide the author name. Example: WWSkin animation - Author: MaulerAttach your screens and/or files to the forum post, unless your release is too big to be attached. This is very important as it's the only way to make sure that in a couple of months/years, your download still exists. If you do not follow this, your tutorial will face unapproval and will be deleted/removed until you have done so..If possible, please keep tutorial videos under 15 minutesPlease only reply to tutorials specifically if their is an error or mistake, that way the original author can correct any errors, and other comments, replies can be asked,talked about in our 'General Discussion' forum.No external links to anything, if found, your tutorial will be removed (archived tutorials may contain external links- being fixed)No illegal material, warez, cracks, etcMost commonly used topic prefixes VIDEO 3DSMAX RENX W3D LEVELEDIT PHOTOSHOP SERVER SIDE HOWTO TEXT MISC - used in Miscellenous subforum and for tutorials that cover multiple programs All posts to subforums are currently moderated, so please be patient, and follow the guideline and your topic will be posted ASAP Failure to comply to these guidelines, your tutorial risks removal.. Please be patient, topics will not be approved right away, but will be approved asap, thanks! Other than that please let us know how we are doing, and please give us feedback to help improve Renhelp.