

zunnie
-
Posts
6653 -
Joined
-
Last visited
-
Days Won
433 -
Donations
180.00 USD
Content Type
Profiles
RenHelp
Renegade Maps
Test Wiki
Forums
Downloads
Events
Posts posted by zunnie
-
-

http://www.ultraaow.com/ranks/NewMaps/ranks_2013_February.php
Congrats to TitMilk for winning February 2013's Prize:
Ice Age 4: Arctic Games!
Once we get around to talking to him he will receive the prize in his Steam account.
To receive your copy you must have a Steam Account @ http://www.steampowered.com
-
Aah.mp3 nice.wav
-
No it's not, Lava isn't neither. Gotto update it again in the near future.
-
C&C_Escobar_Island
A map created by "Pwn Call" and his first public release on MPF for the UltraAOW NewMaps 4.0 server.
Download
http://multiplayerforums.com/index.php?/files/file/192-cc-escobar-island/
The Design
The buildings are relatively far apart here which makes it a little hard to repair sometimes.
The obelisk and agt do not cover the Refinery very well so better watch it.
There is a big base wall on which you can get on top of over the ramps. Good sniper vantage points!
The plateau extends all over the map through the center. Some weapon spawns here and there and a crate too.
When?
Right now! It is installed on the server and in rotation!
Screenshots
-
@Arty/MRLS: Not really, nod won that map btw... We were pinched in for a little while, but made it back out and then nod won.
@Platform: Maybe in Beta 2 sooner or later, first want to see how it plays out. It is supposed to be tight around buildings.
-
C&C_Lava
Mauler and me have finished working on the map C&C_Lava. The textures were mostly made by Mauler as well as the bigass rocks that cover the scenery.
Beware that you cannot drive or walk over the lava, you will die lol.
The Design
Scene is set in a fantasy world with 3 volcano's and lots and lots of hot Lava! The map is divided into several small islands where some have a building on it.
They are connected with a dozen bridges to access each building's island.
In the center of the map you can find two Helicopter Pads which can be repaired to full health after which you can purchase a GDI Orca or a Nod Apache for $700.
The Silo's and Repairpads do not count to the buildings and can be repaired when they are killed.
Inside the Sniper Towers are weapon spawners. A crate spawns in the center.
When?
Right Now! Beta 1 is already installed on the server and is in rotation.
Just join and let the 4.0 integrated downloader download it when it comes by (20MB).
Screenshots
Video -
http://www.ultraaow.com - Visit our Website
NewMaps Marathon Weekend
The Weekend of March 1st-3rd we will increase the maximum player count to 75 players temporarily and the Time Limit will be set to 0 (infinite) as per Marathon rules.
In the past there used to be servers with 127 players full lol which was AWESOME! We hope to achieve a full server @ 75 this Weekend Event which will be great too.
When?
Friday the 1st of March till Monday morning the 4th of March 2013.
TT 4.0 Update is Required
The Tiberian Technologies Update 4.0 for Renegade is required to play on the server.
You can download it on their official website if you do not already have it.
It adds lots of extra's, anti-cheat and a ingame automatic map-downloader, awesome stuff!
Active Server Plugins
Of course the server will run our own mpf_newmaps.dll plugin which adds additional functionality to the server such as Veterancy and Special Crates & Power-ups.
Other plugins running on the server are for example the Team Donate and Infinite Ammo.
For a full list of modifications and adjustments please visit our Website. (changelog)
Maprotation
Deth_River TCW_Demo Silent_Dawn Urban_Rush Snipers Siege SeasideSunset
Crevasse Blaat Tropics Whoreglass RiverValley Node_War Tomb High_Altitude
TiberiumRedux Pacific Dawn_Raid Jungle DomesV2 Killer_Cove Last_Stand
Plunder_Valley Woodland TheCanyon HauntedLol Underpass Quick_Draw
Forgotten_Town Niagra Oasis_Fly MetroTS Damm Battleground Aftermath Carnage
Wasteland ArcticXP Permafrost Sidewinder Arid Tib_Pit_3 Big_Walls BunkersTS
Snow_Warfare Gigantomachy High_Noon_21 Tobruk BattleCreek Fortress2k4 Mars
Worthy_Classic Cairo Dockside Alpine Clan420z GlacierTS The_Moon Islands_KOTH
SeasideCanyon Death_Village River_RaidTS Ocean_View BasinTS Night0X Tropical2
Hon_Dom Mediterranean Air Winter_Field Tib_Field Temple Snow HauntedHouse
The_Core Conquest_Island
Mappack is Available
You could download our Mappack before joining the server. This ensures you have all the maps already.
Then you will not experience any ingame download dialogs which may take long if you have a slow(er) connection.
All you do is click Next, Next, wait for it to install the maps and then you're done and ready to join.
Thanks
Thanks people for reading this and maybe joining up this upcoming Friday the 1st of March.
Please feel free to spread this news around a bit to attract more people and let's see if we can have some fun the Weekend it lasts.
Teaser Video by Bazil, Kenz3001 and Mauler
//Greetz the MPF UltraAOW Team
-
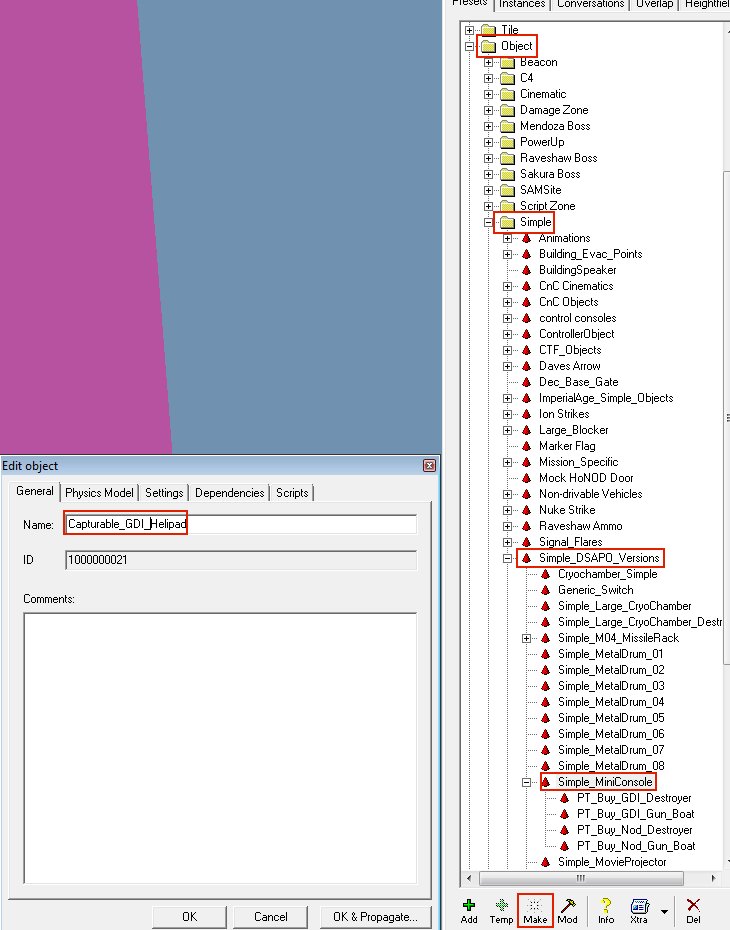
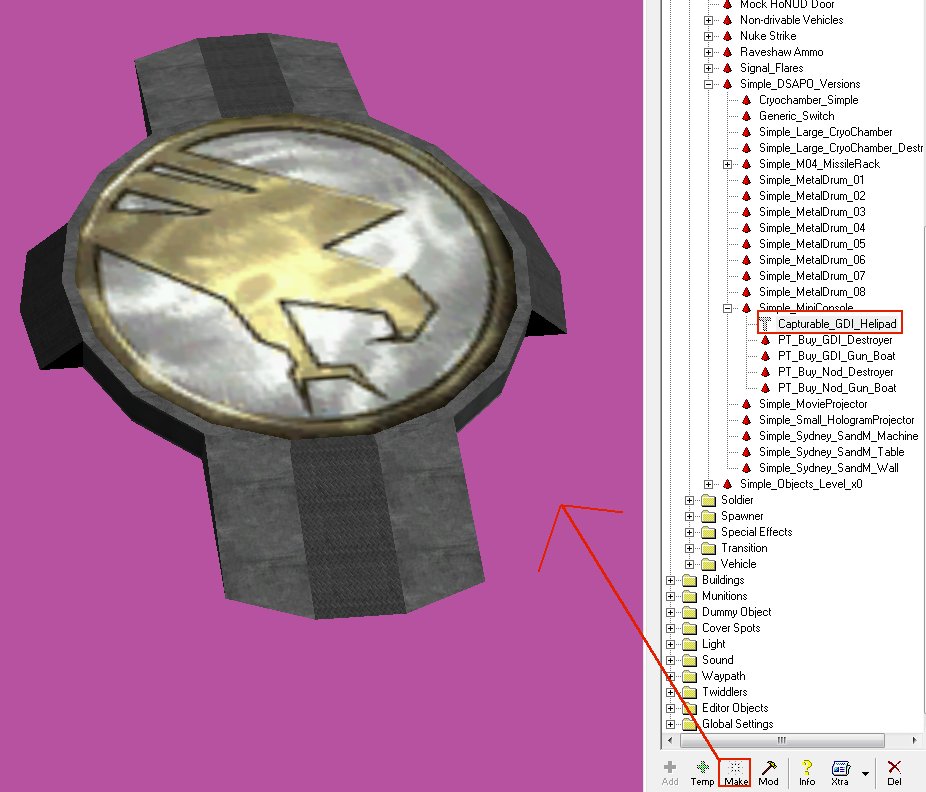
The Helipad models and textures are in zip: CapturableHelipads.zip
Temp Object->Simple->Simple_DSAPO_Versions->Simple_MiniConsole and name it Capturable_GDI_Helipad
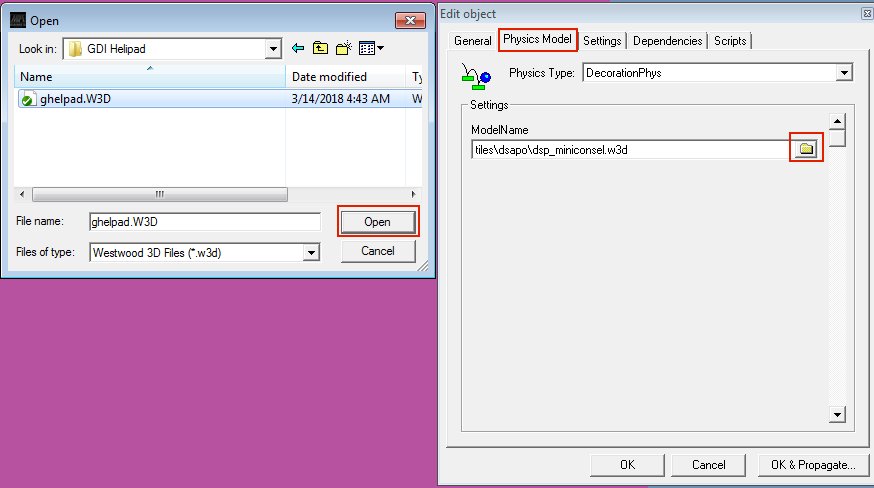
On the Physics Model tab browse for the model by clicking the folder icon and choose Open
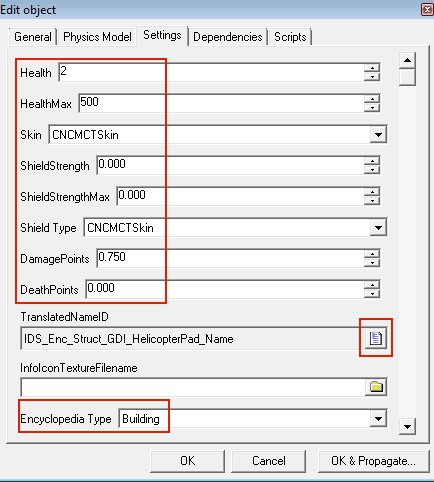
On the Settings tab set Health to 2 and HealthMax to 500,
Skin and ShieldType both to CNCMCTSkin with a DamagePoints of 0.750 and DeathPoints 0.000
Click the Letter icon to choose the Helipad name from the category Enc and set Encyclopedia Type to Building
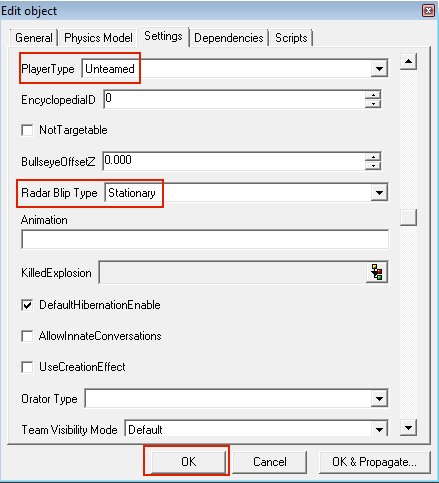
Still on the Settings tab set PlayerType to Unteamed and Radar Blip Type to Stationary
Now MAKE your Helipad on the map
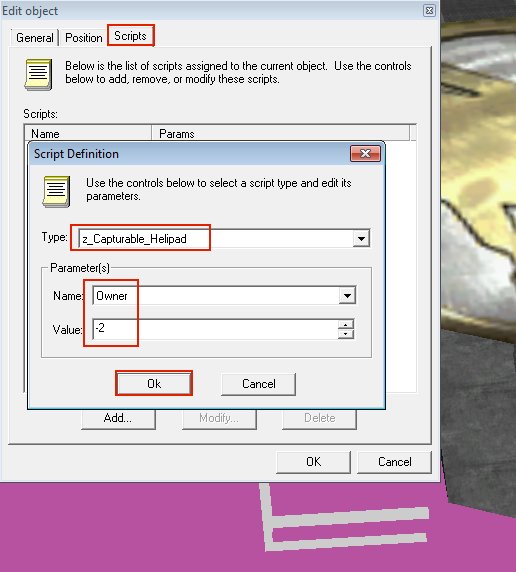
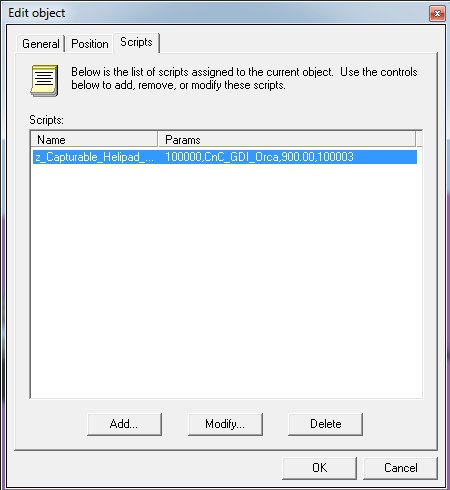
Goto the Scripts tab for the properties of the Helipad and select Type: z_Capturable_Helipad and set the Name Parameter of Owner to -2
Now note the ID of the Helipad in a textfile for later use:
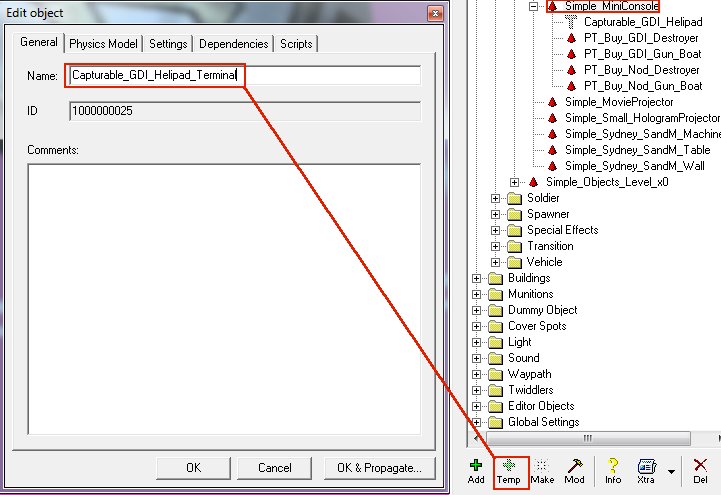
Now TEMP the Simple_MiniConsole and name it Capturable_GDI_Helipad_Terminal
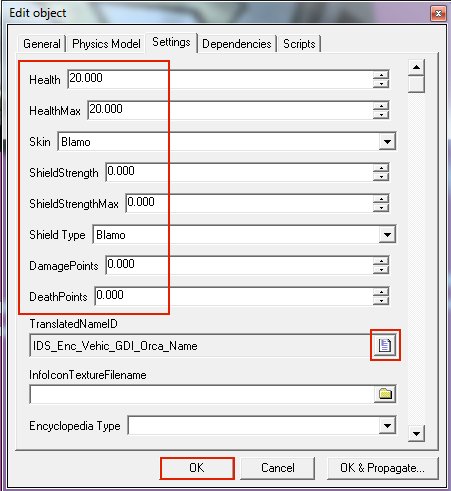
On the Settings tab for the Terminal set the Skin and Shield Type to Blamo and Damage and Deathpoints to 0.000
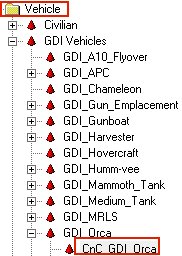
We want this Terminal to grant a Orca so we click the Letter icon and choose the Orca name from Enc category:
Make note of the GDI Orca exact multiplayer presetname, in our case this would be the original preset aka CnC_GDI_Orca (case sensitive):
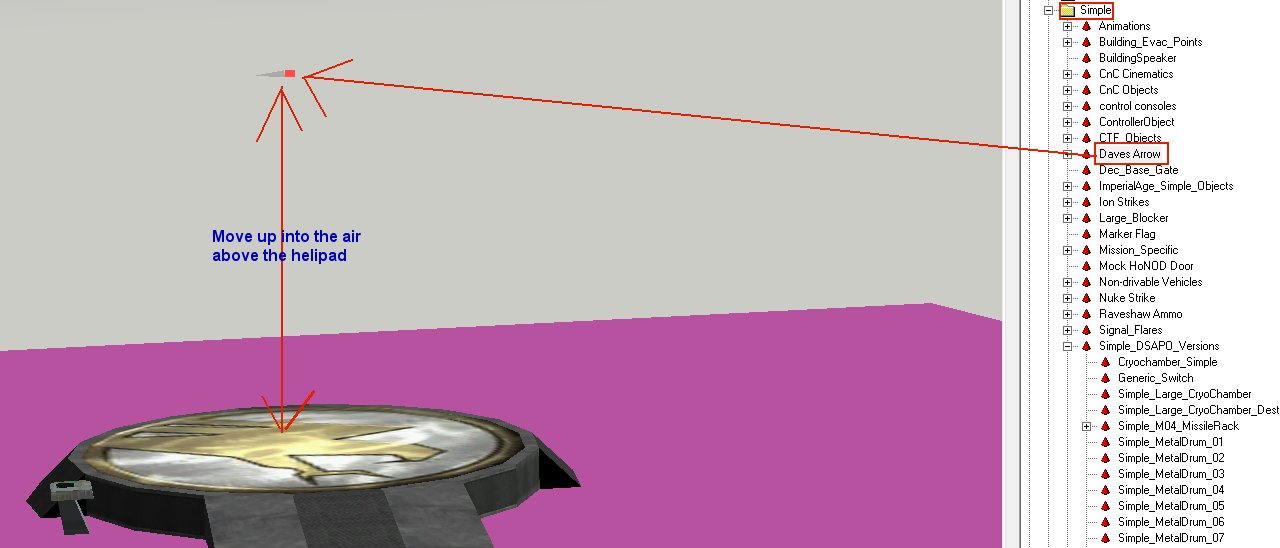
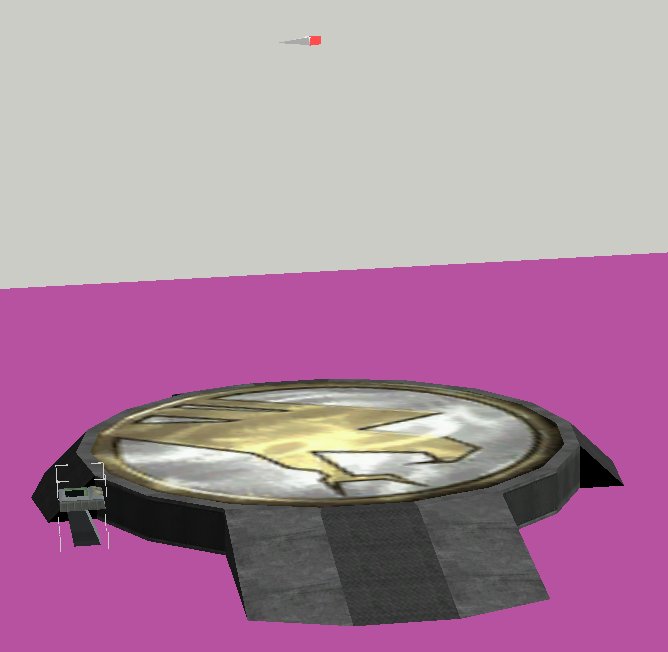
Next we MAKE and position a Daves Arrow on TOP of the Helipad and move it UP on the Z-axis until it floats like 3 orca's high in the air above the Helipad like so:
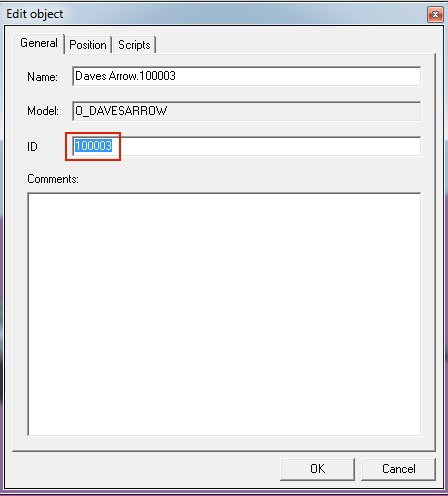
Note the ID of this Arrow (PS: Do NOT delete the arrow, you must leave it on the map)
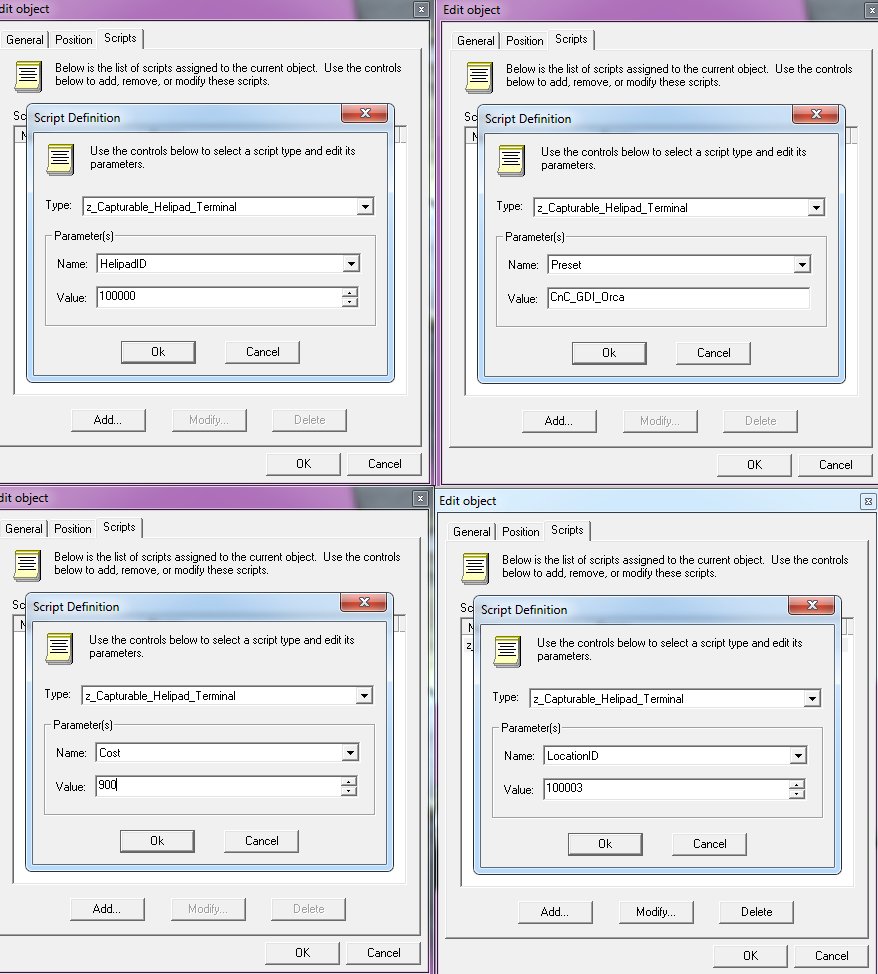
Go back to the Helipad Terminal on the map and goto its properties and the Scripts Tab, add the following script to it "z_Capturable_Helipad_Terminal"
with the settings as displayed below.
HelipadID would be the ID of the Helipad on the map we created first, in this example ID number 100000
Preset would be the vehicle to create at the location of the Daves Arrow we placed so CnC_GDI_Orca and 100003
An Orca costs $900 in Renegade so we enter that as the Cost for it.
Endresult should look like this for the Helipad Terminal:
You're done:
-
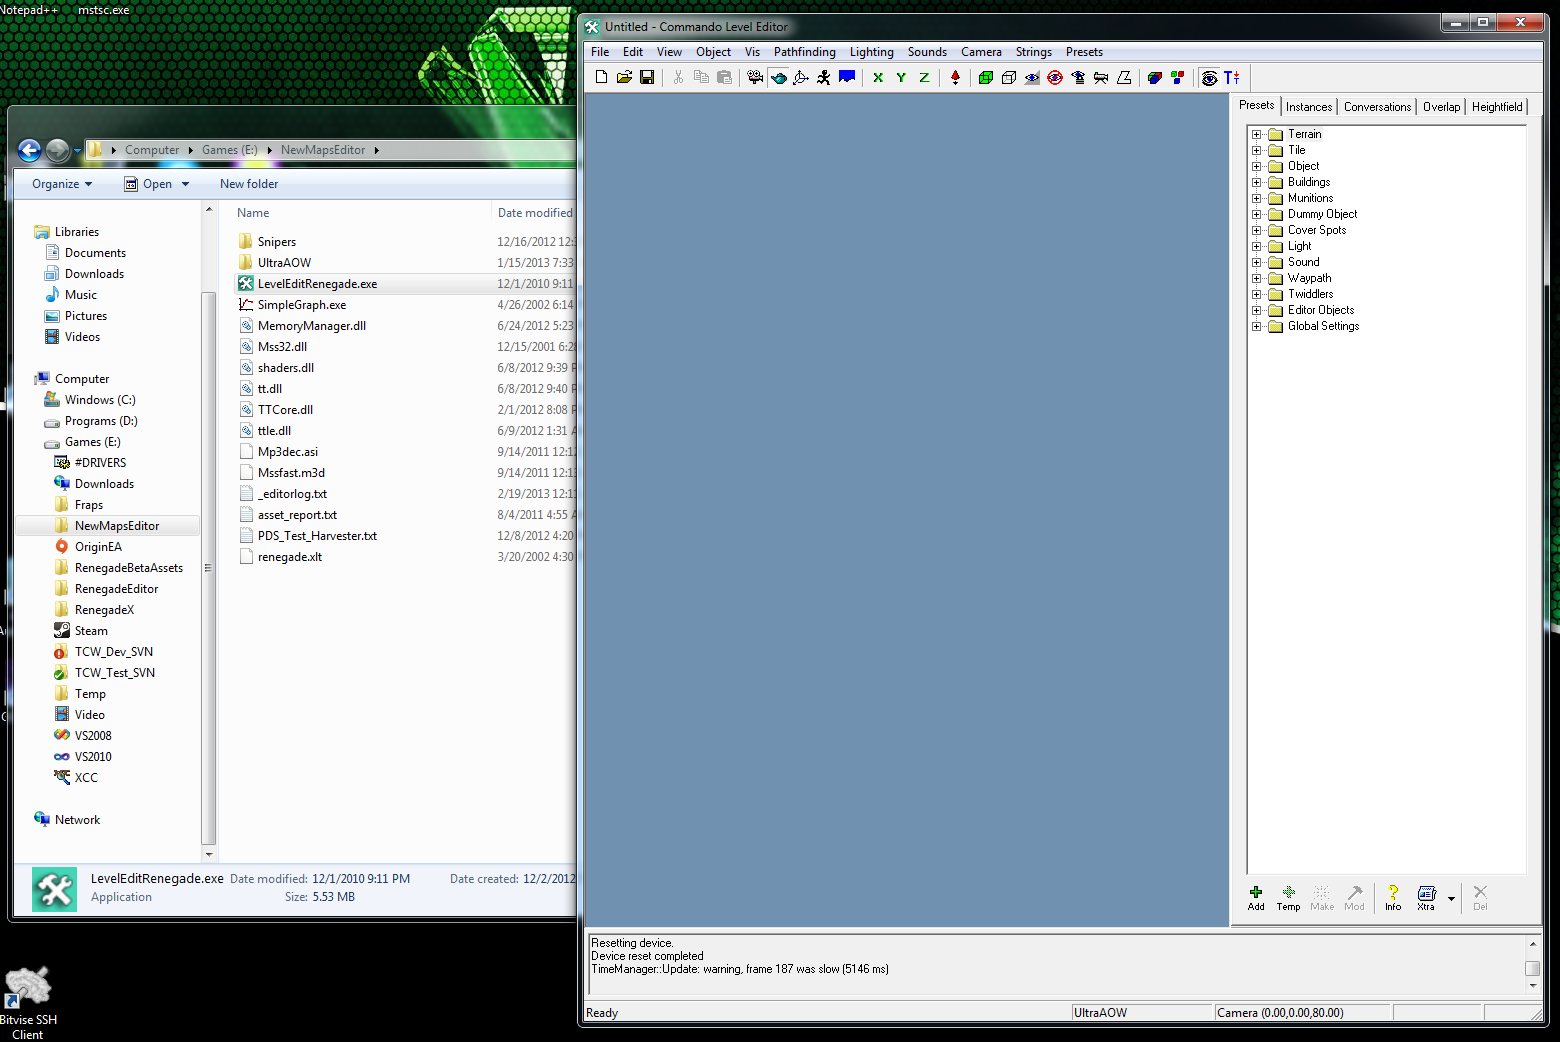
Ok i made a copy of my reply and posted it as a tutorial under misc: http://multiplayerforums.com/index.php?/topic/720-organizing-work-environment/
-
In this tutorial we are gonna create a custom strings_map.tdb for inclusion with your map.
This file will hold the translation for custom presets that you make on your map such as Tiberium Silo (view tutorial) or Repair Pad (view tutorial) so that when you 'aim' for the building the translation text under it says "Tiberium Silo".
First we goto our Renegade folder (which has TT4.0 applied) and run the program "tdbedit.exe"
You are presented with the following screen:
We goto File->Open and browse for our LevelEdit\MODDIR\ALWAYS\TranslationDB\ and select and open the file strings.tdb
In my example the file is located at E:\NewMapsEditor\UltraAOW\ALWAYS\TranslationDB\strings.tdb
We are presented with the following in the program:
We goto Edit->Add Category and name it MyMap (name it the actual mapname there) and hit OK.
A new category is added to the strings.tdb
Goto File->Save and click it so the new file is saved and then EXIT the program again.
Next we open our Editor and goto Strings->Edit Table, once there, click on (1)the arrow at the right to goto your MyMap category, select it(2).
Then (3)double leftclick on the empty line as on the image below:
On the next screen we see the defaults:
CodeID MUST be 100% unique so always prefix it properly like "IDS_MyMap_TiberiumSilo" for example.
You cannot use spaces or special characters in the CodeID box.
For String we choose the object that needs a translation like in our example "Tiberium Silo".
The String box CAN contain special characters and spaces.
Now press OK. And the string is inside the file
Press OK again to confirm it.Now goto your (1)Tiberium Silo in the preset-tree and choose (2)"Mod" while having it selected.
On the Settings tab click on the letter button(1), a new window opens, click on the (2)arrow and scroll to the right until you see your map category(3) and click on it.
There you see the ID for your custom translation (4)"IDS_MyMap_Tiberium_Silo" then click (5) OK.
Now the preset has the translation applied, simply press OK again to make it effective.
See (1) what it should look like:
Now save your map.
Goto your ALWAYS\TranslationDB\ folder and COPY the strings.tdb file and PASTE it into your Levels\MyMap\
Once there, you RENAME it to exactly: strings_map.tdb
Then you include that file into your mix as well by using XCC mixer.
Now when you play your map the Tiberium Silo will actually say it is a Tiberium Silo and not a Gun emplacement anymore
Have fun.
-
You can find a bunch of nice old CNC tracks on my website at zunnie.multiplayerforums.com
When you decide to use one of these on your map you must keep the filename exactly like it is there.
Why?: Some other maps already use this MP3. To keep a long story short: If you rename them then there may arise conflicts with other maps. So nonono.mp3 to renaming them.
Just use them on your map as they are.
Edit: In 4.1 and on renaming them won't matter. Still i'd leave them as they are
Let's get started:
(1)expand Sound, then (2)select Music and then (3)click the Temp button:
Give it a name, for this example it is Frank_Klepacki_Act_On_Instinct:
On the Settings tab now we configure the following options:
Filename - Browse for the MP3 file inside your Level Mapname folder
Drop-off Radius - 7000.000
Max-Vol Radius - 6000.000
m_Volume - 1.000
m_Priority - 1.000
All other settings are correct already and need no attention.
Now OK it all. Then (1)select the preset in your list and (2)click the "MAKE" button, a sound icon appears on your map.
It is best if you place this music icon in the center of your map.
If you have a large map you may need to adjust the Drop-off Radius and Max-Vol Radius to a higher number.
Have fun
-
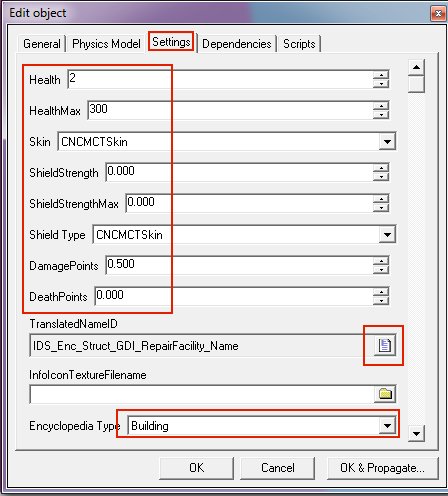
The Repair Pad models and its textures you are gonna need are in the zip: CapturableRepairpads.zip
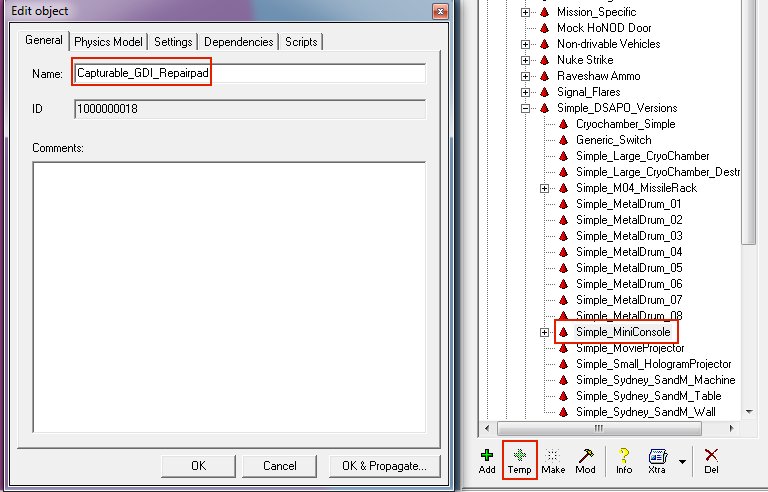
Temp it under Object->Simple->Simple_DSAPO_Versions->Simple_MiniConsole and name it "Capturable_GDI_Repairpad":
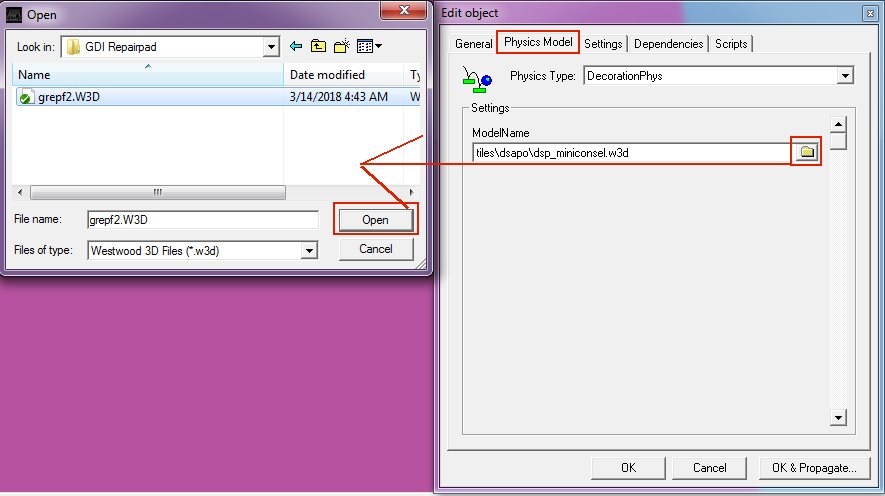
On the Physics tab browse for the model by clicking the folder icon and open it:
Give it 2 Health, 300 MaxHealth (Shield & ShieldMax should be 0.000)
Give it CNCMCTSkin as Skin and Shield Type (even if its set to 0.000)
Click the letter icon for TranslatedNameID and go into the Enc category and find the RepairFacility one as shown below
Make the Encyclopedia Type a Building
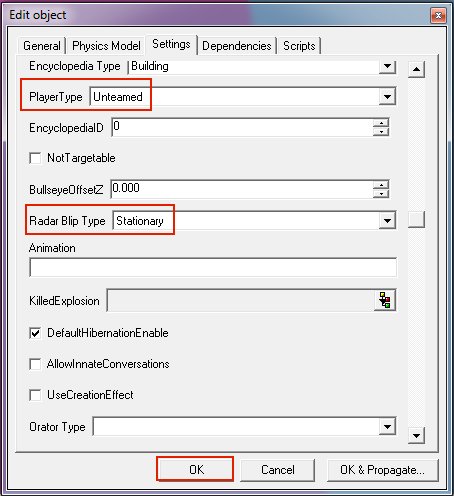
Still on the Settings tab set PlayerType to Unteamed and Radar Blip Type to Stationary
Now you can "MAKE" it on your map:
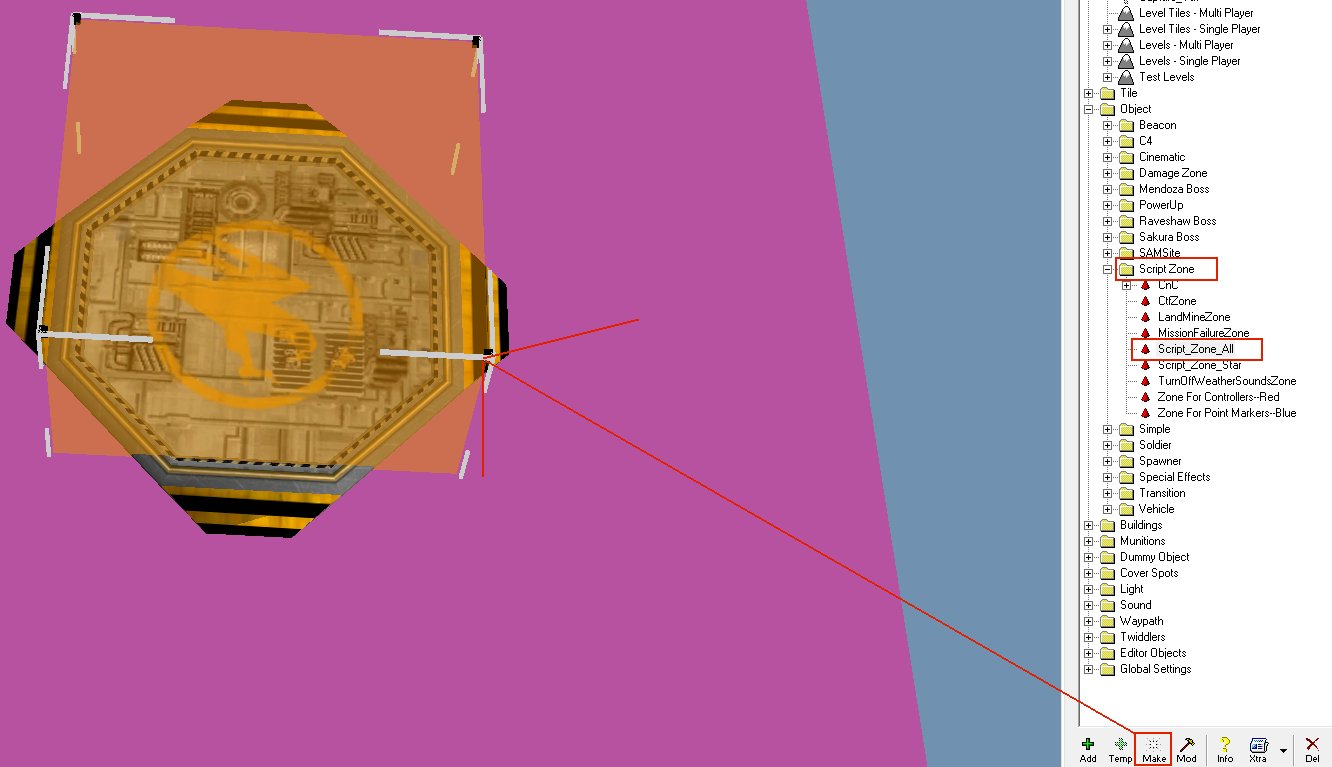
Next goto Object->Script Zone->Script_Zone_All and MAKE it, position it on top of the repairpad as seen on the image below.
To make it higher in length hold down SHIFT and then move your mouse up/down by selecting the black little boxes of the zone.
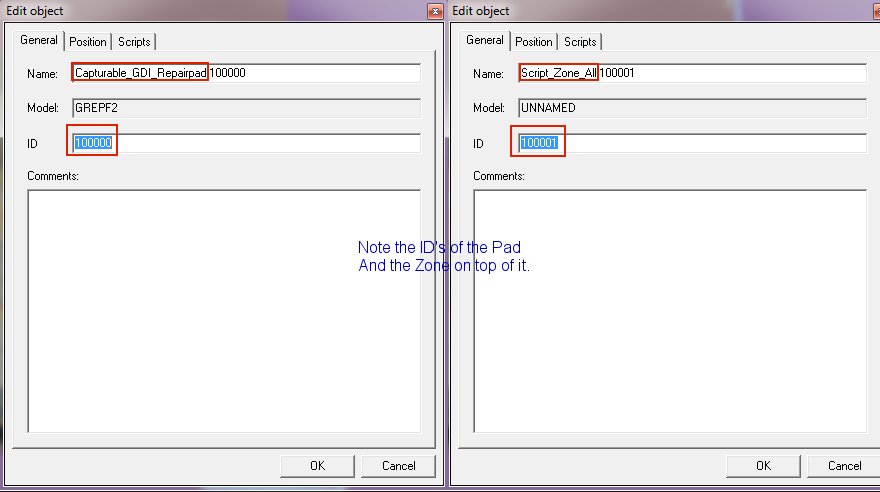
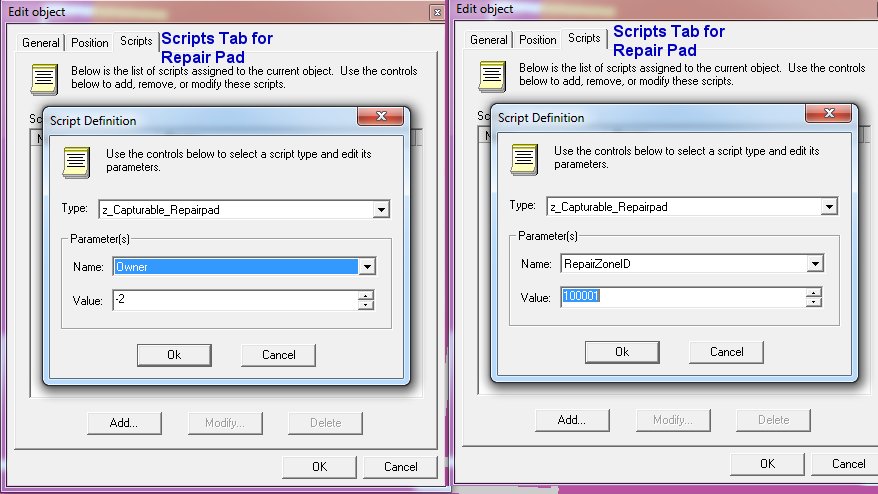
Now get to the properties of the Repairpad and note its ID, in this example 100000
Get to the zone properties too and get its ID, in this case 100001
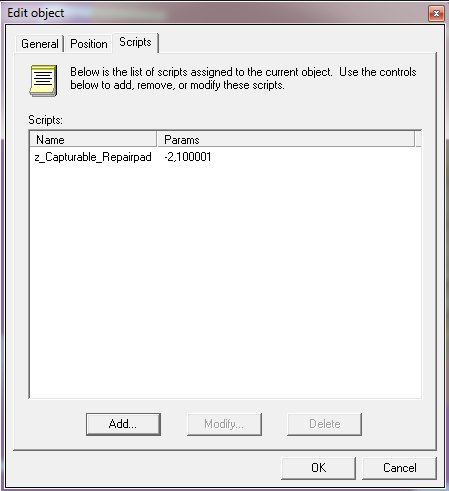
Goto the properties of the Repair Pad and its Scripts Tab, there you add the script z_Capturable_Repairpad with the Name parameter of Owner set to -2 (unteamed)
Set the Name parameter RepairZoneID to the ID of the Zone you noted in the step earlier, which in this example is 100001Endresult should look like this for the repair pad:
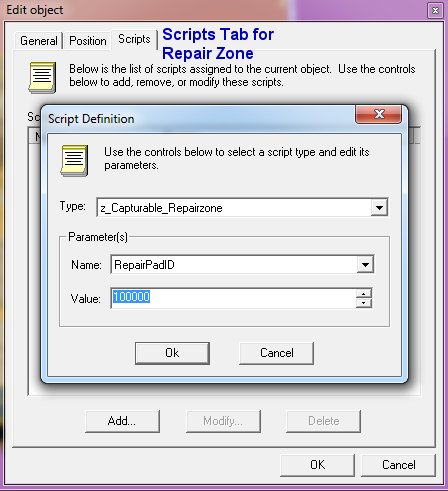
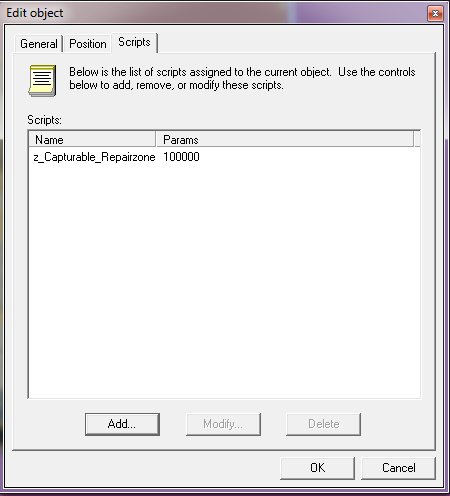
Now edit the Script_Zone_All that you placed on top of your Repairpad by going to its properties and on the scripts tab add the script "z_Capturable_Repairzone" and set the Name parameter for RepairPadID to the ID you noted earlier for the Repairpad, in this example it is 100000
Endresult for the zone should look simular to this:
Now save your level and you will have a capturable repair pad on your map!
Repeat the above process for Nod but then with the Nod model of course. -
Ok this is how I do it:
I create a folder inside \Levels\ called with my mapname for example TCW_Snipers
Inside this folder i place my terrain W3D's which i export from 3DSMax8, the strings_map.tdb for custom translations and the .lvl file(s) when i save the map in there as C&C_TCW_Snipers.lvl,
i also have a folder called 'includes' in there which contains ALL other files i use in the map, wav's, tga's, dds's and mp3's, i do that so i know which files should go into my mix file when the map is done.
The EditorCache folder contains ALL the textures i use on my map(s) ie all the tga's and dds's. The wav's and mp3's don't have to go there.
I make my mix's manually. Simply put: Just copy C&C_Field.mix from your Renegade Data folder to your Level folder and rename it to C&C_Mymap.mix.
Then open your C&C_Mymap.mix with XCC mixer (double click on it to open a mix) delete ALL the C&C_Field files from it so you end up with a empty file.
Next you drag and drop in ALL the files from your 'includes' into the XCC window, the .lsd .ldd and .ddb and strings_map.tdb from your level folder as well and finally the W3D's that make up your terrain. Your mix file is now ready and can be used on the game
If you have questions let's see them
here is XCC mixer: http://multiplayerforums.com/index.php?/files/file/77-xcc-mixer/
Here some ss's from my folders to give you a little insight how i arrange it all:
-
ALWAYS are the files loaded fromt he always.dbs and .dat like the armor settings and warheads, you cannot modifiy these in a map, only in a mod.
Characters, im not sure...
EditorCache is where you put your tga and dds textures (in ADDITTION to your level file folder) so they show up when you load your map.
presets is where the editor stores the presets that are available ingame and your temps(custom presets for maps) note you can ONLY temp stuff when making a map
-
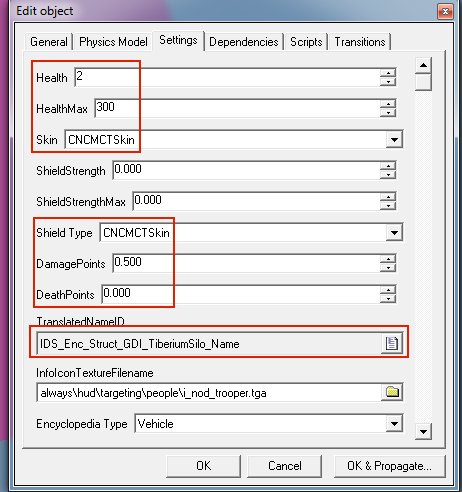
Required Files: CapturableTiberiumSilos.zip
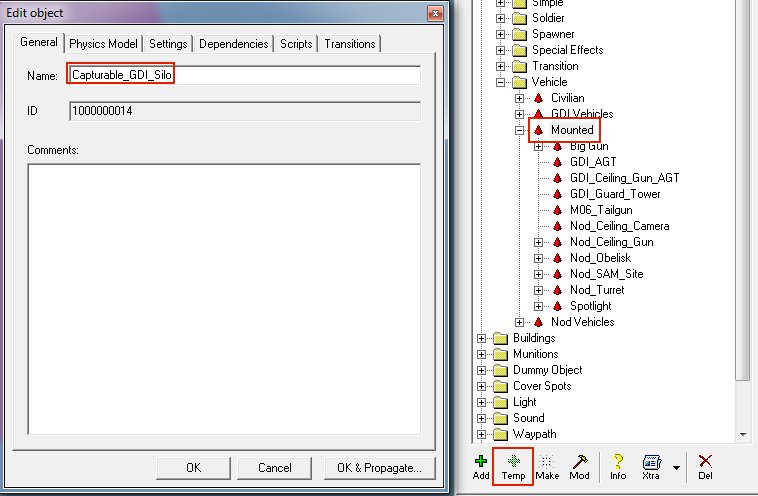
TEMP a preset into Object->Vehicle->Mounted and call it for example "Capturable_GDI_Silo":
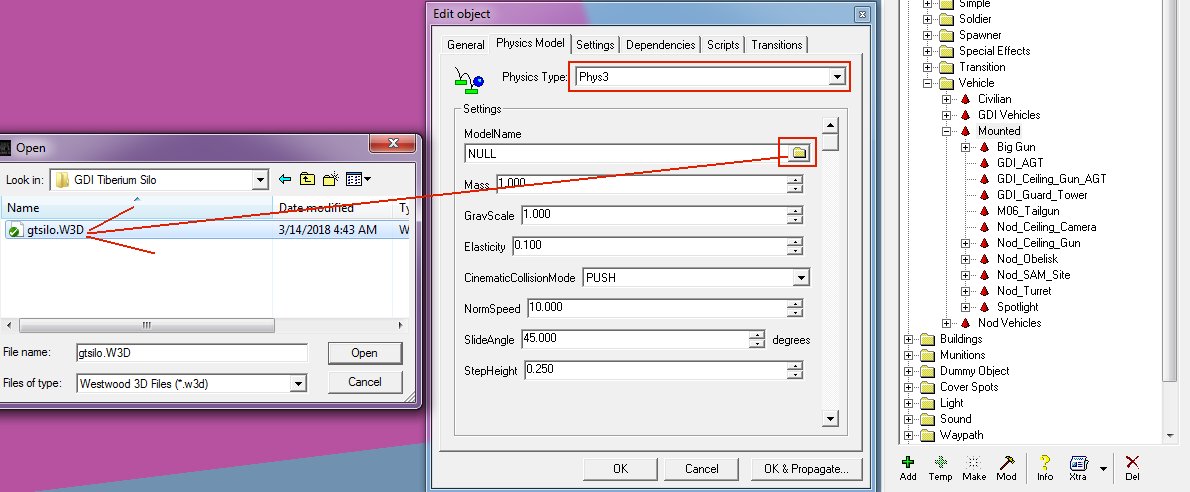
Goto the Physics Model tab and for ModelName click the folder button and browse for the gtsilo.W3D file, click Open:
Goto the Settings tab and set Health to 2 and Healthmax to 300 (yes: ShieldStrength and Max should be 0.000)
Set Skin to CNCMCTSkin and Shield Type to CNCMCTSkin
Set DamagePoints to 0.500 and Deathpoints to 0.000
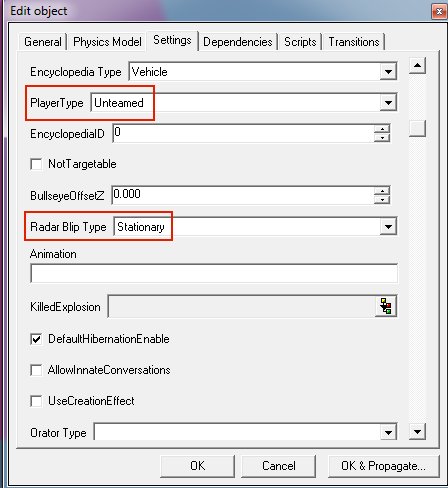
Set the TranslatedNameID to IDC_Enc_Struct_GDI_TiberiumSilo_Name (found in the strings editor under the Enc category)Still on the Settings tab set PlayerType to Unteamed
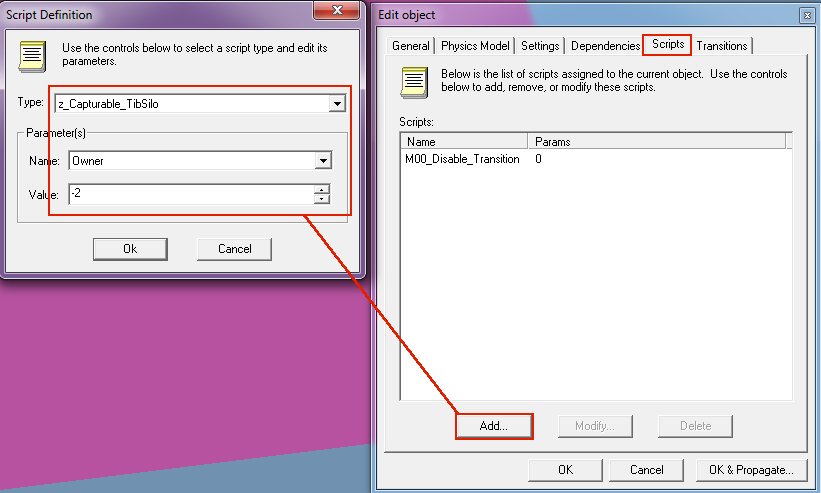
Radar Blip Type should be StationaryGoto the Scripts tab and click Add... for Type browse for the z_Capturable_TibSilo
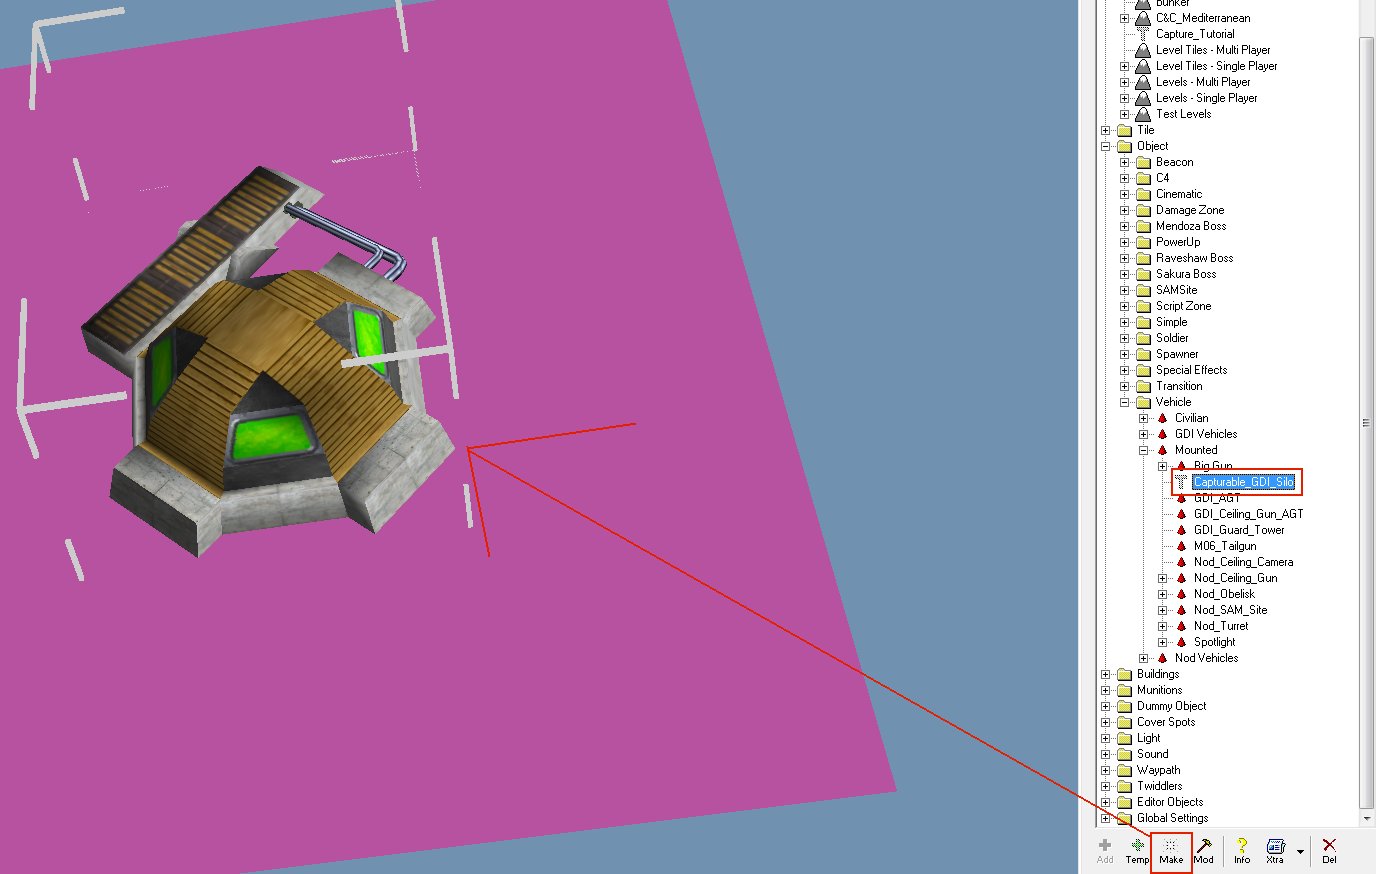
For Name parameter Owner we set the Value to -2 (which means unteamed).Now select your temped preset called Capturable_GDI_Silo and click on "Make" button.
It will appear on your map. Save your level and make your mix file.
Now people can play your map and capture the silo.
Repeat the above process for the Nod Tiberium Silo but set Team to Nod, that's all.Greetz zunnie
- trunkskgb and Hunter-Seeker
-
 2
2
-
If it didnt work then the preset list at the right, the folders, dont all have a [+] in front of them which should happen. (or at lest 95% of them)
Show a screenshots of your leveleditor and we can tell right away if its correct or not
It should look like this:
-
- Popular Post
- Popular Post
It is online right now and serving a CoD4 and CSGO 32 player server
Server IP = 95.211.223.6
Both the CoD4 and CSGO server are running on the default port so you do not need to enter them when trying to connect.
Have fun!
- zunnie, Hunter-Seeker, alexrirak and 2 others
-
5
-
-
Ah well shit.mp3
We'll schedule another devnight soon -
-
It starts in less than an hour (i'm already ingame) all join
-
Hit me up on IRC or TS3 later today, i'll teamview and help you do it
-
Original Authors: Bumpaneer, StoneRook and Andre
First step, I’d like to give big thanks for Bumpaneer on allowing me to write this tutorial on realistic
water making for Renegade. Well, let’s get started.
- Load your Ren-X
and make a plane 10x10 or bigger. Remember this is only to get you
started, once you learn this tutorial, you will be able to make the
water any size you wish.
- Press the M key on your keyboard, which should open the Renegade Material Editor.
- Click on the blue box icon (Make New Renegade Material) to avoid conflicts between a material already used in other object. Then, change the Pass Count to 2 and select the Surface Type (Naturally Water) as show in the picture below:
- Usually, when you start by the Pass 1 tab, Ren-X crashes, so let’s move on to Pass 2 tab, then we come back to set up the #1.
BumpScale=0.2
BumpRotation=0.3
VPerSec=-0.01
And don’t forget to change the Stage 1 Mapping Type to Environment (Basically to make it reflective) as shown in the picture below:
- Now let’s move to the Shader tab (Still inside Pass 2 Tab). Select the Blend Mode to Add. On the Advanced (Still on Shader Tab, but on bottom), select the Pri Gradient as Bump-Environment and the Detail Color as Add. Watch picture below:
- Now let’s move to the Textures tab to set up the textures and the details of the water and it’s movement.
- Check the Stage 0 Texture and click on the None button to select the proper texture. Use the texture called bump_water.tga here.
- Now check the Stage 1 Texture (Detail Texture) and click again on None button and select the texture named water_reflect.tga
- Once you are done with setting up Vertex Material, Shader and Texture tabs on Pass 2, click on the button shown on the picture (Assign Material to Selection) to apply the changes to rhe object.
- Now let’s move back to Pass 1. On Vertex Material Tab, change the Stage 0 Mapping Type to Linear Offset and add VPerSec=-0.01 to the Args box, as shown in the picture on next page.
- There is nothing to change or set up on Shader Tab, so let’s move directly to the Textures Tab on Pass 1.
- Check the Stage 0 Texturing and select the remaining texture included in the pack:
Finished Product:
Tutorial Written by André. Realistic Water technique developed and improved by Bumpaneer and StoneRook.
If
you wish to know how to make more realistic effects for Renegade, start
using WDump provided with the Renegade Mod Tools, there you can view
all W3D’s Textures settings, making you be able to duplicate any effect
Westwood added to their maps with textures.
== Enjoy Your New Realistic Water ==
-
I'll be there for sure
(99.9%)


Grand Prize Contest - Renegade Snipers - February 2013 - Winner: fscjames
in Community News
Posted
http://www.ultraaow.com/ranks/Snipers/ranks_2013_February.php
Congrats to fscjames for winning February2013's Prize:
Electronic Arts's Command and Conquer Ultimate Collection on the Origin Platform.
Once we get around to talking to him he will receive the prize serial code and can download the content to his Origin account.
To receive your copy you must have an Origin Account @ http://store.origin.com