-
Posts
6653 -
Joined
-
Last visited
-
Days Won
433 -
Donations
180.00 USD
Content Type
Profiles
RenHelp
Renegade Maps
Test Wiki
Forums
Downloads
Events
Everything posted by zunnie
-
http://www.tiberiumcrystalwar.com - View the new Site! The new website design is now in place, i finished it this morning. No: I did not entirely make this myself, it was a theme i found online, i just modified it Still looks badass i think The header logo will be replaced with a new one soonish, i will bugg Kenz3001 about it as soon as i smell him making his first morning coffee hehe
-
Tiberium Crystal War Developer Night Amsterdam (Netherlands) Saturday, 30 March 2013, 17:00:00 CET UTC+1 hour Calgary (Canada - Alberta) Saturday, 30 March 2013, 10:00:00 MDT UTC-6 hours New York (U.S.A. - New York) Saturday, 30 March 2013, 12:00:00 EDT UTC-4 hours London (United Kingdom - England) Saturday, 30 March 2013, 16:00:00 GMT UTC Paris (France) Saturday, 30 March 2013, 17:00:00 CET UTC+1 hour Moscow (Russia) Saturday, 30 March 2013, 20:00:00 MSK UTC+4 hours Sydney (Australia - New South Wales) Sunday, 31 March 2013, 03:00:00 EDT UTC+11 hours Beijing (China) Sunday, 31 March 2013, 00:00:00 CST UTC+8 hours New Plymouth (New Zealand) Sunday, 31 March 2013, 05:00:00 NZDT UTC+13 hours Introduction Hello everyone i would like to announce that we are going to hold a new gaming event for Tiberium Crystal War. Most, if not all, of our Developers and Testers will be available during this event so you can ask questions and or make comments about the current version 1.52 and the upcoming version 2.0 which is under construction. Newcomers If you are a newcomer to Tiberium Crystal War or never heared of it, go watch our video trailer first on homepage. Tiberium Crystal War is a full standalone conversion of the Renegade W3D Engine, you do not need Renegade to play it and you can run it aside Renegade just fine. It consists of structures, vehicles, units, sounds and many other assets from the game C&C 3: Tiberium Wars which were worked up by our Developers to work with Renegade. There are 15+ maps and a few different game-modes such as the classic All Out War, Deathmatch, Co-Op and Domination. If you want you can look at our Official Manual Where You can download the Tiberium Crystal War v1.52 client from our website at http://www.tiberiumcrystalwar.com There are several mirrors available and all are hosted on 100mbits connections. Thanks & Have fun Thank you all for reading this and maybe joining up in this event, we haven't held any events for a while so we hope to see many people join up and have some good old fun. I would really love to see many people ingame this time again so Please spread the word and let's have some bigass fun in there Greetz the Tiberium Crystal War Development Team TiberiumCrystalWar.com
-
Tiberium Crystal War Developer Night Amsterdam (Netherlands) Saturday, 30 March 2013, 17:00:00 CET UTC+1 hour Calgary (Canada - Alberta) Saturday, 30 March 2013, 10:00:00 MDT UTC-6 hours New York (U.S.A. - New York) Saturday, 30 March 2013, 12:00:00 EDT UTC-4 hours London (United Kingdom - England) Saturday, 30 March 2013, 16:00:00 GMT UTC Paris (France) Saturday, 30 March 2013, 17:00:00 CET UTC+1 hour Moscow (Russia) Saturday, 30 March 2013, 20:00:00 MSK UTC+4 hours Sydney (Australia - New South Wales) Sunday, 31 March 2013, 03:00:00 EDT UTC+11 hours Beijing (China) Sunday, 31 March 2013, 00:00:00 CST UTC+8 hours New Plymouth (New Zealand) Sunday, 31 March 2013, 05:00:00 NZDT UTC+13 hours Introduction Hello everyone i would like to announce that we are going to hold a new gaming event for Tiberium Crystal War. Most, if not all, of our Developers and Testers will be available during this event so you can ask questions and or make comments about the current version 1.52 and the upcoming version 2.0 which is under construction. Newcomers If you are a newcomer to Tiberium Crystal War or never heared of it, go watch our video trailer first. Tiberium Crystal War is a full standalone conversion of the Renegade W3D Engine, you do not need Renegade to play it and you can run it aside Renegade just fine. It consists of structures, vehicles, units, sounds and many other assets from the game C&C 3: Tiberium Wars which were worked up by our Developers to work with Renegade. There are 15+ maps and a few different game-modes such as the classic All Out War, Deathmatch, Co-Op and Domination. If you want you can look at our guides: n00b guide & Official Manual Where You can download the Tiberium Crystal War v1.52 client from our website at http://www.tiberiumcrystalwar.com There are several mirrors available and all are hosted on 100mbits connections. Thanks & Have fun Thank you all for reading this and maybe joining up in this event, we haven't held any events for a while so we hope to see many people join up and have some good old fun. I would really love to see many people ingame this time again so Please spread the word and let's have some bigass fun in there Greetz the Tiberium Crystal War Development Team TiberiumCrystalWar.com
-
http://mpf.gameme.com :: View Server Stats We now have very detailed game statistics provided by GameME for the games CounterStrike Global Offensive and Team Fortress 2. Hopefully this will attract some players to the servers We had around 10 people earlier this morning which was quite fun. Our servers are running MetaMod and SourceMod so if you find a cool plugin or extension for either please do let us know and we might put it on the server(s). You can join our CS:GO Servers at the following addresses and add them to your favorites: 95.211.223.6:27015 (Office 24/7) 95.211.223.6:27055 (Iceworld_Arena_GO 24/7) You can join our Team Fortress 2 server at the following address and add it to your favorites: 69.162.64.93:27015 Have fun!
-
Should the coop have Purchase Terminals available or not? and Should the coop have limited amounts for certain characters? Gameplay will be tougher because you really have to assemble a team of various characters to complete the level. Hotwire(s) for repairs, Gunners for anti vehicle/turret, Snipers for anti infantry and Officers and Patches maybe. Officers would have the ability maybe to call in air support in the form of dropping bots and/or ammo maybe. All bots will randomly drop armor, health or a weapon (or sometimes nothing). Players that died will drop the Key they had if any. Players that died will drop their primary weapon or a DNA powerup allowing a member of the team to change character on the spot if it is really needed. For example if a Hotwire is missing in the group, a officer could pick it up to provide the team with repairs. Some objectives will require Key Cards and/or a specific Unit to complete. Please vote what you think would be best.
-
Version 1.0
58 downloads
Laeubi: This model is based on an unfinished Westwood model of a gaurd tower that can be seen in the WW building pack, I made this from scratch, I have not used the unfinished model as a base. I have included my skin of the neutral cannon emplacement that gives it a light gold colour to resemble a GDI unit. -
-
- laeubi
- stealth generator
-
(and 2 more)
Tagged with:
-
Version 1.0
143 downloads
Laeubi: 171 PT icons in all, If you wish to include/edit any of these icons and/or include them in a mod give credit to the original creator in your read me. All PT icons have the correct dds settings and are all the same size, 128 x 128 pixels. This is the size which 'in game' pt icons are displayed at you just need to name them. -
Version 1.0
117 downloads
Laeubi: All models are ready to use, you just need to add them to your map (on a flat surface). Since the last version I have optimised the texture sizes and material types in other words you get better FPS. and replaced 'n_ped.tga' with 'n_pedpmc.tga' texture zunnie: For a nice tutorial to use teleporters on your map please see this topic. -
Version 1.0
75 downloads
Laeubi: I made these a while ago for some of my old maps They have been made with a single 256x256 texture (one for the green set and one for blue set) unlike other crystals I have seen that use multiple textures, which, in my opinion waste resources for very little gain. Don't forget to add the texutures to your mod folder. -
- 1 review
-
- renx
- lightposts
-
(and 2 more)
Tagged with:
-
Version 1.0
105 downloads
Laeubi: These Blank PT icons were created by Taximes (as far as i know, I havent seen him lately) The 6 PT icons include the standard GDI and Nod icons and a Civilian, Mutant, Xtras and a blank gray one. I've uploaded them here as i think i'm one of the few active members of the community that has them (and has found them on his HDD ).- 1 comment
-
- purchase terminal icons
- pt icons
-
(and 2 more)
Tagged with:
-
-
I edited your post a bit roszek Its better to use renlist for a number of reasons And he needs to update to 1.037 before installing 4.0
-
So you want a teleporter for players on your map? This is possible. I made two scripts for this purpose, one that teleports anyone, and another that teleports only players from a specific team. Ofcourse you can use other scripts for this but i will focus this tutorial on the two i made myself which are available in 4.0 The two scripts are called "z_Enter_Teleport_Random" and "z_Enter_Teleport_Random_Team". You can also use this for the teleporters as it looks much cooler than a stupid pedestal: http://multiplayerforums.com/index.php?/files/file/212-teleport-tubes/ First lets move on to the Editor and we place a CtfPedestalGold on the map which will function as the visual indicator for this teleporter, stepping on this pedestal will teleport a player to another location. Expand (1)Object, then (2)Simple, then (3)CTF_Objects and finally select (4)CtfPedestalGold Now click the make button and it will appear on your map: Now, the way my scripts work is simple: You place 5 "Daves Arrow" on your map, the ID of each of these Arrows are used by the script and randomly select one of them to teleport the player to. So we are now gonna place 5 of these Dave Arrows on the map. Expace (1)Object, then (2)Simple, then select the (3)Daves Arrow and (4)make 5 of them on the map near the location where you want players to teleport to: Now double click on each of the Arrows and note their ID in notepad: In my example they are: 100438 100439 100440 100441 100442 Now that we have the ID's let's finally actually create the area that will teleport the player. Expand (1)Object, then expand (2)Script Zone and there select the (3)Script_Zone_Star and click (4)Make to place one on your map. A green box will appear on the map, position it over the pedestal, you can resize it with the black boxes at each corner, hold shift to size it up and down. Make the box appear like on the example screenshot below: Now double click on the green box, a new window will appear. Goto its "Scripts" tab. There click on "Add" and scroll down to z_Enter_Teleport_Random and select it. Here you enter all the five ID's we wrote down in Notepad earlier: The endresult should look like this (based on my example ID's above): Now save your map, make a mix file and try it out! Players that step on the pedestal will be teleported to the locations of the Dave Arrows you placed randomly. PS: If you want a TEAM oriented teleporter then use z_Enter_Teleport_Random_Team and do the same thing but with Team enter 0 for Nod and 1 for GDI, then only players of that team can use the teleporter.
-
- 1 comment
-
- original
- hand of nod
-
(and 5 more)
Tagged with:
-

2 - intermediate [HOWTO] Organizing Work Environment Setup - Renegade Tools
zunnie replied to zunnie's topic in Miscellaneous
I was asked by a few people to do this. So this is how i work with my editor and stuff I find it very handy but like always some people might not think so and do it different Thats fine.. I just hope this helps some people get under way with mapping for Renegade. Although i myself use 3dsmax8, for legal reasons i could not include that in the files of course, so i made one for RenX. If you do get a copy of 3dsmax8 the environemnt setup is pretty much the same really.. Anyway, good luck with your mapping -
The Environment Setup Tutorial This tutorial will attempt to learn you how to setup your entire working environment for creating maps in gMax and the free provided Renegade Public Tools v2. It includes all the tools you need and they should be installed in this particular order: 1- The gMax Installation Files and Registration ByPass 2- The official Renegade Public Tools version 2 3- The unofficial LevelEditor from Tiberian Technologies for support with 4.0 Scripts Update 4- The Registry fixes i wrote which you *should* review, edit if needed, and then merge into your Registry by double clicking on it 5- Some Critical Assets required for making a map for Renegade in gMax/Renx 6- The XCC mixer i personally have been using since i don't know when, it's the best Create the Installation folder In this tutorial i will install EVERYTHING to do with mapping for Renegade in my folder on the E drive in RenegadeMapping. It is best to choose a folder without any spaces in it or special characters such as C:\RenegadeMapping or D:\RenegadeMapping etc. Create the folder now! And inside the RenegadeMapping folder create another folder and call it #Files (with the # so it is always listed at the top of the structure). Now save the following file inside the #Files folder: DOWNLOAD THE REQUIRED FILES PACKAGE HERE End result should look simular to this: Extracting the Archive Extract the zip anyhow you like as long as you extract all the folders and files inside the #Files folder created earlier. The end result should look simular to this: Installing gMax Go into the gMax 1.2 Installation Files folder and run gmax12.exe Click next and accept the agreement. On the next window it will ask for the Installation destination. Here click on the BROWSE button and goto your RenegadeMapping folder and create a folder there called gMax. After installing gMax successfully must first run the Registration ByPass file. Go inside the gMax 1.2 Installation Files folder again and double click on the file called 'Autodesk.reg'. In some cases you will get a warning about it potentially being able to harm your computer, just ignore it, this is not gonna harm your computer in any way. Click YES when it asks if you are sure if you want to continue: When successful you will see the following message: Installing the official Renegade Public Tools v2 Go into the Renegade Public Tools Installation File folder and simply run the Renegade_Tools_Installer_2.exe file. Take note that you install both options 'Renegade Tools' AND 'RenX GMax Gamepack'. If you don't then gMax will be useless for makin maps for Renegade. Again, we are going to install this into the RenegadeMapping folder we created earlier. So make sure you point the installer to that folder by clicking the Browse button: Click NEXT to start installation, the next window will ask you where your gmax location is which is inside your RenegadeMapping\gMax Check if the suggested destination is correct (in most cases it will be) and continue with the installation. Tiberian Technologies 4.0 compatible LevelEditor We now need copy the newer TT4.0 LevelEdit.exe and replace the older LevelEdit.exe Go into the RenegadeMapping folder and into the TiberianTechnologies-LevelEdit Files folder, in here is only 1 file called 'LevelEdit.exe'. Right click on the file and COPY it, now head into your just freshly installed RenegadeMapping\RenegadePublicTools\LevelEdit folder and PASTE and OVERWRITE the existing one there: The Registry Fixes Take very close attention to this! First locate your Game2.exe, so goto the folder where you installed Renegade at, this is usually inside "C:\Westwood\Renegade" (for Retail both 32 and 64 bit) or "C:\Program Files\EA GAMES\Command & Conquer The First Decade\Command & Conquer Renegade\Renegade" If you have 64 bit Windows and The First Decade it is mostlikely installed at "C:\Program Files (x86)\EA GAMES\Command & Conquer The First Decade\Command & Conquer Renegade\Renegade\" notice the (x86) in the path? So now that we located our Game2.exe we need to enter that into one of the 4 available .reg files. - How on earth do i get the complete path to my Game2.exe? Open your FILE-BROWSER (NOT webbrowser lol) and goto your installation folder for Renegade. Once there left click once in the addressbar, it will turn to normal text, copy it and simply append \Game2.exe to it, like so: Now right click on the correct reg file and edit it with notepad. Remember to use double backslashes between folders like in the possible examples below: "D:\\EA GAMES\\Command & Conquer The First Decade\\Command & Conquer Renegade™\\Renegade\\Game2.exe" "D:\\The First Decade\\Command & Conquer Renegade\\Renegade\\Game2.exe" "D:\\Westwood\\Renegade\\Game2.exe" If you have 32 BIT Windows 7 and Retail Renegade then edit, run and merge the file : "InstallPath_Renegade_Retail_32.reg" If you have 64 BIT Windows 7 and Retail Renegade then edit, run and merge the file : "InstallPath_Renegade_Retail_64.reg" If you have 32 BIT Windows 7 and The First Decade then edit, run and merge the file : "InstallPath_Renegade_TFD_32.reg" If you have 64 BIT Windows 7 and The First Decade then edit, run and merge the file : "InstallPath_Renegade_TFD_64.reg" First LevelEdit Run Goto your RenegadeMapping\RenegadePublicTools\LevelEdit\ folder and run the file LevelEdit.exe A new window opens up with a empty window and two buttons OK and New... Click on NEW and give it your nickname, zunnie in my case: Now the screen should look like the following: Double click on the entry with your nickname! LevelEdit will now attempt to load hurray: If you did the previous step correctly and merged the file with your registry then the LevelEdit should load up just fine and show you something like this: If you did something wrong, it will crash when you load your modpackage with your nickname :/ To fix this, you have to do the previous step again and again until you figure out how to adjust the Registry file properly and merge it into the Registry. Of course you can also post on the forums here, or ask me on IRC or Teamspeak 3 to help (irc.multiplayerforums.com and ts.multiplayerforums.com). Assuming it all went fine, go ahead and CLOSE the LevelEdit again. Folder Layout for your future New Map(s) Goto your RenegadePublicTools\LevelEdit folder, you will see 5 folders present there: Go into the Levels folder and create a folder called "C&C_Awesome", Inside the folder C&C_Awesome create another folder and call it "Includes" The reasons for this are simple: When you have made your map in Renx (gmax) you will export your terrain to your Levels\C&C_Awesome\ folder. Now ofcourse you will use textures on your map which you setup in Renx, those textures have to be included in the mix file for your map. The .TGA (or DDS in some cases) go into your Includes folder. If you use music on your map or custom sounds they ALSO go into your Includes folder. Then you always have the files ready for creating your map mix file later on and it is a simple matter of dragging and dropping them into the XCC window explained later. Your .TGA (and sometimes .DDS) files should ALL also go into your EditorCache folder else they will not showup in the LevelEdit. So: Always copy your custom files into Includes, and the TGA/DDS ALSO go in EditorCache. Music and other files dont need to go in your EditorCache. Setting up RenX (gMax) If you properly merged the Autodesk.reg into your Registry you can start using RenX (gMax) right away. Open the RenX program through your startmenu under RenegadeTools. You do not start gMax. Always RenX. Somewhere after clicking Continue and OK you have to choose a Driver to use, always select Direct3D: If everything went cool, we now got this screen: Goto Customize->Configure User Paths Click on the Materials line and then click the Modify button. Now pay close attention: Go into the textures folder (so: RenegadeMapping\gMax\gamepacks\Westwood\RenX\textures\) and then add a backslash \ to the end of the path, like on the screenie below: If you do not add the backslash there, it will not properly select the folder... so make sure you do that.. End result should look like this: Now close RenX again and proceed to the next steps below. Installing the Renegade Textures Goto your #Files folder and inside the Gmax Asset Files and then textures, COPY all these textures (ctrl+a to select them all) to your textures folder from RenX so inside "RenegadeMapping\gMax\gamepacks\Westwood\RenX\textures\" End result should look like this: Now you can apply several textures from your folder in RenX and actually see them too... The Scenes folder Copy the Scenes folder inside Gmax Asset Files to your RenegadeMapping\gMax\gamepacks\Westwood\RenX\ folder and overwrite the one that is already there (it is empty anyway). The scenes folder contains all the buildings you need to make a map, and some extra stuff, check it out! Using RenX I'm gonna assume you will follow other tutorials available on http://www.renhelp.net for creating your first terrain in RenX. I've quickly wipped up the following terrain with texture and GDI Barracks: Goto File->Export and browse for your RenegadeMapping\RenegadeTools\LevelEdit\zunnie\Levels\C&C_Awesome in here you save your map as a W3D Renegade Terrain, name it for example awesome.W3D Now the W3D is saved in your Levels\C&C_Awesome folder. Remember what i said about textures? I used the texture 01lv1-roc4.tga on this map so i copy this file from the RenegadeMapping\gMax\gamepacks\Westwood\RenX\Textures folder, to my RenegadeMapping\RenegadeTools\LevelEdit\zunnie\Levels\C&C_Awesome\includes\ AND to my RenegadeMapping\RenegadeTools\LevelEdit\zunnie\EditorCache Remember to always do this, or you get confused as to what files will go in your mix or not :/ First map setup in LevelEdit Now that we exported our first awesome.W3D we need to TEMP it under Terrain inside LevelEdit. So startup LevelEdit now and click the plus on Terrain and then left click on the Terrain folder, then click the button at bottom right called TEMP Name it awesome and under the Settings tab for m_ModelName browse for your Levels\C&C_Awesome and select awesome.w3d and then click OK. A new entry with a grey "T" appears under the terrain, select it and click on MAKE at the bottom right: Use the Camera icon to move around the world with your left and right mouse button. Use the blue Teapot to SELECT objects on your map, we are gonna place 1 GDI and 1 Nod startup spawner. Position your camera hoovering above the ground a bit looking down on it, in the center of your screen is where the editor will place objects you 'MAKE'. Expand Object->Spawner->Startup Spawners and then leftclick on GDI Spawner MAKE it with the button at bottom right. If the character has a red outline it is placed wrong, usually you can fix that by moving it up along the Z axis a bit. Click on the green Z and then move the character till it has white outlines. Now also select the Nod Spawner and create one on your map place it next to the GDI Spawner. Saving the map ALWAYS a-a-a-always save your map "AS" ie: File->Save current level AS whenever you are gonna save it. So we do that now: Save the current level as C&C_Awesome.lvl inside your Levels\C&C_Awesome\ XCC Mixer and Making a MIX Goto your #Files folder and COPY the folder 006-XCC_Mixer and paste it in RenegadeMapping\ there Rename it to just "XCC_Mixer". Go into the XCC_Mixer folder and copy the C&C_MyNewMap.mix to your Levels\C&C_Awesome\ folder Now rename the C&C_MyNewMap.mix to C&C_Awesome.mix Next we open the XCC Mixer itself by running the XCC Mixer.exe (NOTE: if you have many CNC games installed the FIRST time you start it up may take a while!!! give it a few minutes) So, we got XCC opened up now. Double click on the folders and/or drives to goto your Levels\C&C_Awesome\ folder. Also, run XCC in a little window, resize it like in my screenshot, like so: You see the map C&C_Awesome.mix in the list correct? Double click on it to OPEN it with XCC. Now delete the readme.txt that is in there by rightclicking on it and then choosing delete. Next, keep XCC opened up in a small window, now also open windows explorer filebrowser with your Levels\C&C_Awesome\ opened up too. Now drag and drop the W3D, LSD, LDD and DDB into the XCC window. Do the same for any contents you have inside your Includes folder (NOT the folder itself, the files INSIDE it): Now close XCC mixer! Your new map C&C_Awesome.mix is ready! Copy it from your Levels\C&C_Awesome\ to your Renegade Data folder and try it out! Greetz zunnie
-
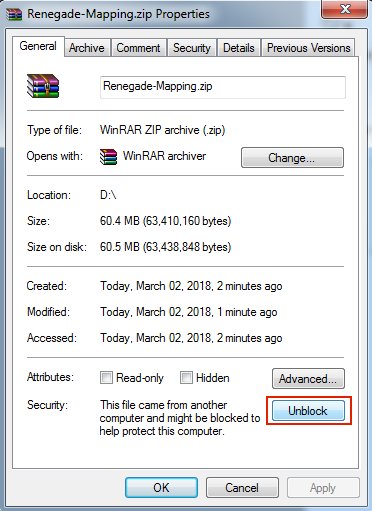
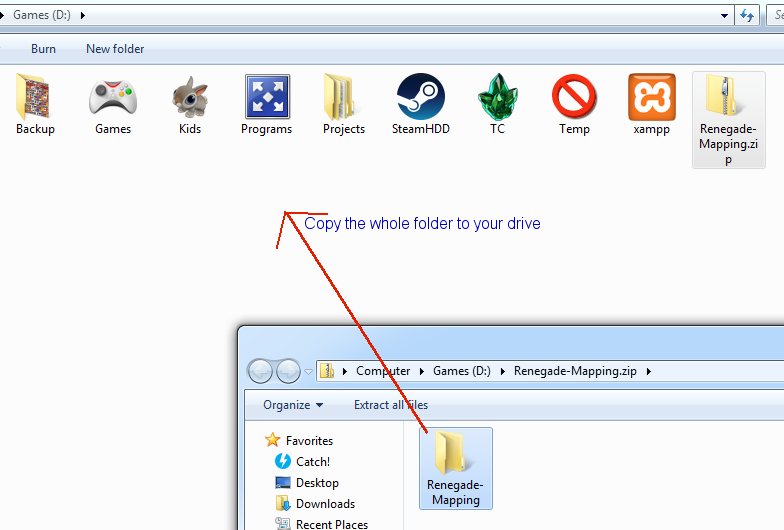
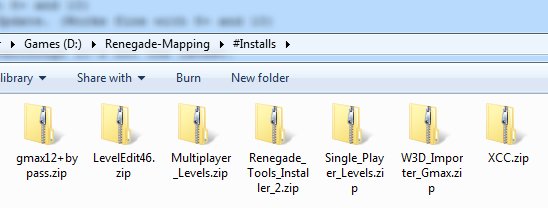
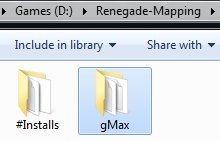
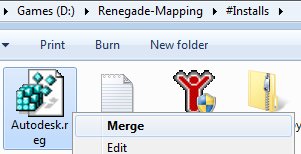
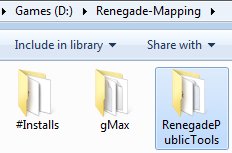
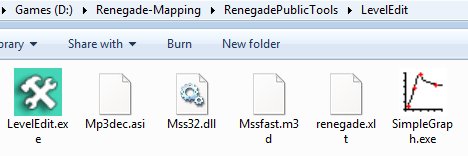
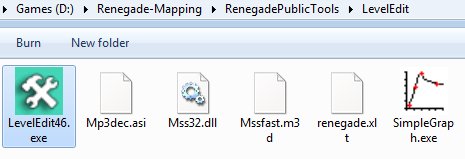
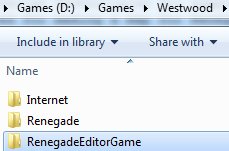
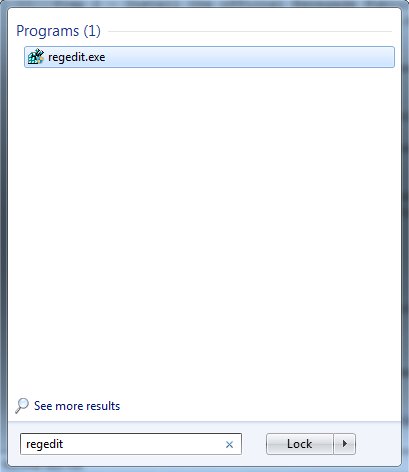
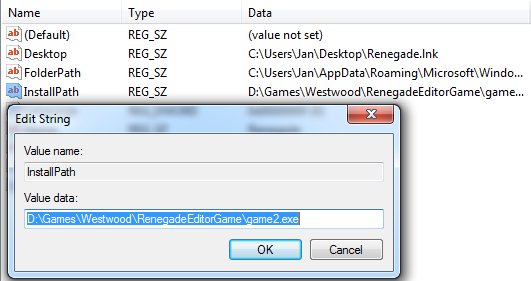
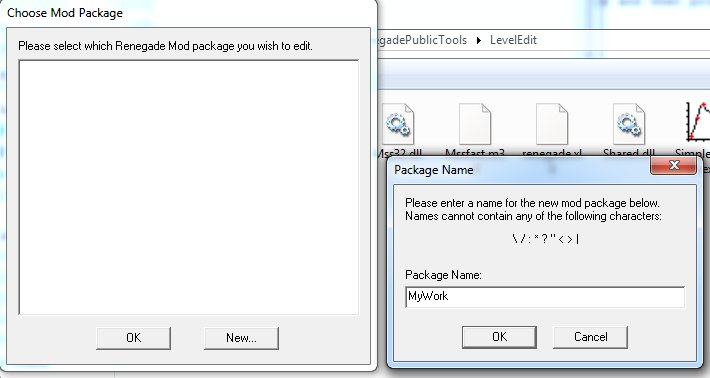
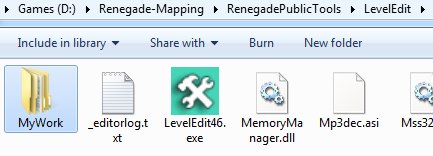
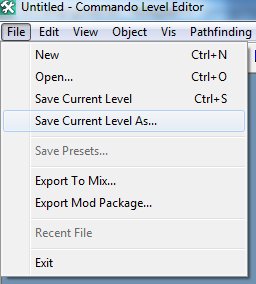
The Environment Setup Tutorial This tutorial will attempt to learn you how to setup your entire working environment for creating maps in gMax and the free provided Renegade Public Tools v2. It includes all the tools you need and they should be installed in this particular order: 1- The gMax Installation Files and Registration ByPass. (NOTE: Windows 8+ and 10 are NOT supported, you'll need Windows 7 or XP Pro to use gMax without glitches, there is NO fix for this.) 2- The official Renegade Public Tools version 2 from Westwood Studios. (Works fine with 8+ and 10) 3- The unofficial LevelEditor from Tiberian Technologies for support with 4.6 Scripts Update. (Works fine with 8+ and 10) 4- Some (semi) Critical Assets required for making a map for Renegade in gMax/RenX. 5- The XCC mixer i personally have been using since i don't know when, it's the best eventhough it's not the latest. Environment Guide Package Download the file i prepared as zip from the MPF download area: Once it is downloaded, make sure you unblock the file by going to the zip properties and clicking "Unblock" BEFORE you extract it. In this tutorial i will install EVERYTHING to do with mapping for Renegade in my folder on the D drive in "Renegade-Mapping". Go ahead and extract the zip somewhere, open it in a new window: And then copy the contents somewhere: Go into the #Installs folder that you extracted inside the Renegade-Mapping folder Step 1 - Install gMax and apply the registry fix We need to install gMax first, you MUST install it first or it won't work properly later. Open the gmax12+bypass.zip and copy files into your #Installs folder and then run gmax12.exe to install it. In this guide i am installing directly into the Renegade-Mapping folder so the endresult will be something like the following: Now, because the author of gMax doesn't send out emails anymore to register gMax for free, there is included a Autodesk.reg file, right click on that and choose Merge and when promted do Yes to merge it. When installation is done and you merged the registry thing, then run gMax for the first time. You will be prompted to select a rendering device, here you choose "Direct 3D" and continue. Once it has fully loaded you must exit gMax again. Step 2 - Install the official Renegade Public Tools v2 Extract the file Renegade_Tools_Installer_2.zip and run the executable, install it into your Renegade-Mapping folder, endresult should look simular to this: Go into the folder LevelEdit and you will see these files: Now delete (yes delete permanently) the LevelEdit.exe that is currently there, the original from Westwood. Extract the file LevelEdit46.zip and copy the resulting LevelEdit46.exe to your LevelEdit folder like so: Goto your Renegade GAME folder, which you updated to the latest TT Script Update (available on http://www.tiberiantechnologies.org ) Copy the following files to your LevelEdit folder and overwrite any existing ones there: "MemoryManager.dll" "Mss32.dll" "Shared.dll" "ttle.dll" You should end up with a LevelEdit folder looking like this: Now make a complete copy of your Renegade game folder (which is updated to 4.6 of course) and name it "RenegadeEditorGame", just copy and paste it somewhere like: Now open the Registry Editor through your startmenu "search" option type: regedit and open it. Expand the folders (or keys as they are called) until you are inside the Renegade folder/key. "HKEY_LOCAL_MACHINE -> SOFTWARE -> Wow6432Node -> Westwood -> Renegade" You see the InstallPath option there? Double click on it and change its value to where your game2.exe is located in the RenegadeEditorGame you copied earlier, in my example here it would be: D:\Games\Westwood\RenegadeEditorGame\game2.exe Now close the Registry Editor program, we don't need it no more now, you don't need to save anything, it does so automatically. Run the Editor Ok, so we can finally run the editor now, go into the LevelEdit folder and run LevelEdit46.exe There click the "New..." button and call it for example "MyWork". Double click the MyWork in the window and it shall bring up the editor in action: You'll notice the editor created a folder called "MyWork": Which contains a few key folders the editor uses: Create a map project folder inside the levels folder like so: Inside this folder you will save your Editor's "C&C_My_Map.lvl" file and stuff related to your map such as W3D models/terrain and maybe textures, cinematic text files and/or audio. ALWAYS choose to "Save Current Level As..." inside the editor ALWAYS WHENEVER you want to save your progress, do NOT EVER use "Save Current Level" (trust me), period, or it will not update some files (lsd/ldd/ddb) for your map and it wont work properly when you make a .mix with XCC later on. For example the endresult could look like this: << i will update this guide later tonight or tomorrow, just 1 thing: If you have missing textures make sure you place them in your Editor_Cache folder and reload the editor >>
-
Appearently the XWIS servers which provide us with a serverlisting are being DDoS attacked. I hope the guys responsible for this will stop attacking it soon so we can have a couple of normal good old fashion games again :/
-
It's happening to all servers, there is nothing we can do about it We can only wait and hope that Olaf from the XWIS gang fixes it asap.
