zunnie
-
Posts
6653 -
Joined
-
Last visited
-
Days Won
433 -
Donations
180.00 USD
Content Type
Profiles
RenHelp
Renegade Maps
Test Wiki
Forums
Downloads
Events
Everything posted by zunnie
-
In this tutorial we are gonna create a custom strings_map.tdb for inclusion with your map. This file will hold the translation for custom presets that you make on your map such as Tiberium Silo (view tutorial) or Repair Pad (view tutorial) so that when you 'aim' for the building the translation text under it says "Tiberium Silo". First we goto our Renegade folder (which has TT4.0 applied) and run the program "tdbedit.exe" You are presented with the following screen: We goto File->Open and browse for our LevelEdit\MODDIR\ALWAYS\TranslationDB\ and select and open the file strings.tdb In my example the file is located at E:\NewMapsEditor\UltraAOW\ALWAYS\TranslationDB\strings.tdb We are presented with the following in the program: We goto Edit->Add Category and name it MyMap (name it the actual mapname there) and hit OK. A new category is added to the strings.tdb Goto File->Save and click it so the new file is saved and then EXIT the program again. Next we open our Editor and goto Strings->Edit Table, once there, click on (1)the arrow at the right to goto your MyMap category, select it(2). Then (3)double leftclick on the empty line as on the image below: On the next screen we see the defaults: CodeID MUST be 100% unique so always prefix it properly like "IDS_MyMap_TiberiumSilo" for example. You cannot use spaces or special characters in the CodeID box. For String we choose the object that needs a translation like in our example "Tiberium Silo". The String box CAN contain special characters and spaces. Now press OK. And the string is inside the file Press OK again to confirm it. Now goto your (1)Tiberium Silo in the preset-tree and choose (2)"Mod" while having it selected. On the Settings tab click on the letter button(1), a new window opens, click on the (2)arrow and scroll to the right until you see your map category(3) and click on it. There you see the ID for your custom translation (4)"IDS_MyMap_Tiberium_Silo" then click (5) OK. Now the preset has the translation applied, simply press OK again to make it effective. See (1) what it should look like: Now save your map. Goto your ALWAYS\TranslationDB\ folder and COPY the strings.tdb file and PASTE it into your Levels\MyMap\ Once there, you RENAME it to exactly: strings_map.tdb Then you include that file into your mix as well by using XCC mixer. Now when you play your map the Tiberium Silo will actually say it is a Tiberium Silo and not a Gun emplacement anymore Have fun.
-
You can find a bunch of nice old CNC tracks on my website at zunnie.multiplayerforums.com When you decide to use one of these on your map you must keep the filename exactly like it is there. Why?: Some other maps already use this MP3. To keep a long story short: If you rename them then there may arise conflicts with other maps. So nonono.mp3 to renaming them. Just use them on your map as they are. Edit: In 4.1 and on renaming them won't matter. Still i'd leave them as they are Let's get started: (1)expand Sound, then (2)select Music and then (3)click the Temp button: Give it a name, for this example it is Frank_Klepacki_Act_On_Instinct: On the Settings tab now we configure the following options: Filename - Browse for the MP3 file inside your Level Mapname folder Drop-off Radius - 7000.000 Max-Vol Radius - 6000.000 m_Volume - 1.000 m_Priority - 1.000 All other settings are correct already and need no attention. Now OK it all. Then (1)select the preset in your list and (2)click the "MAKE" button, a sound icon appears on your map. It is best if you place this music icon in the center of your map. If you have a large map you may need to adjust the Drop-off Radius and Max-Vol Radius to a higher number. Have fun
-
The files you need for this tutorial: CapturableRepairPads.rar The map this tutorial is based on is from the Capturable Tiberium Silo's tutorial over here. However you do not need this map to complete this tutorial. It is just so you know why on earth there is a Tiberium Silo present on the map and preset list. Just focus on the stuff i tell about the Repair Pads I'm gonna skip adding the terrain to your presets this time and go straight to the Vehicle preset. So, open your Editor and (1)expand Object, then (2)expand Vehicle and then (3)expand Mounted and finally (4)select the preset "GDI_Guard_Tower" and (5)press the "TEMP" button. In the next popped up window when we pressed Temp we enter the name for it so "GDI_Repair_Facility" We goto the Physical Model tab and for Physics Type we leave it on DecorationPhys, look below and at ModelName we (1)click the folder button and browse for our "grepf.W3D" which is the GDI Repair Pad. On the Settings tab now, scroll down to PlayerType and make sure it is on GDI (or Nod if this is for the Nod Repair Pad) Scroll down to WeaponDefID and (1)click on the colored button, a new window pops up with Weapons, there in the list (2)select "None" and OK it. The WeaponDefID afterwards is completely empty. Goto the Scripts tab and (1)click on "Add" then on the dropdown (2)goto "z_Capturable_Repairpad" and (3)set Owner to 1 for GDI (or 0 for Nod). There is another parameter called "RepairZoneID" we (4)leave that on 0 for now. We end up with something like this. Then just OK it so that the new temped preset is added to the preset-tree: Now select the preset you just made (the GDI_Repair_Facility) and click "MAKE", it should now appear on your map like so: Next we need a Script_Zone_All on top of the repairpad which will repair friendly vehicles when they drive on the repairpad. First (1)expand Object, then (2)expand Script Zone and then (3)select Script_Zone_All Now "Make" it on top of the repairpad like this: You see the black boxes at the corners? Left click on them to make the zone larger and make it cover a large area of the repairpad. If you hold your SHIFT key while moving the black boxes it will extend the zone up and down, make it look like this: Now double click on the Script_Zone_All on your map (while in Object manipulation mode, press F6 or click the Teapot), a window will pop up where you can find the ID of the zone. Write it down: We use that ID for the script under the Scripts tab like on the image below: What it should look like: Now double click on the Repair Pad on your map and note its ID: Next double click on the Script_Zone_All you placed on top of the Repair Pad again and goto its Scripts tab and put the script "z_Capturable_Repairzone" on it and set the RepairPadID option to the ID of the RepairPad on your map. Now we are finished! Now save your map, make a mix file, host your map and then you can repair GDI vehicles on the Pad. When it is destroyed you can simply repair it again and it will continue to repair friendly vehicles. Good luck!
-
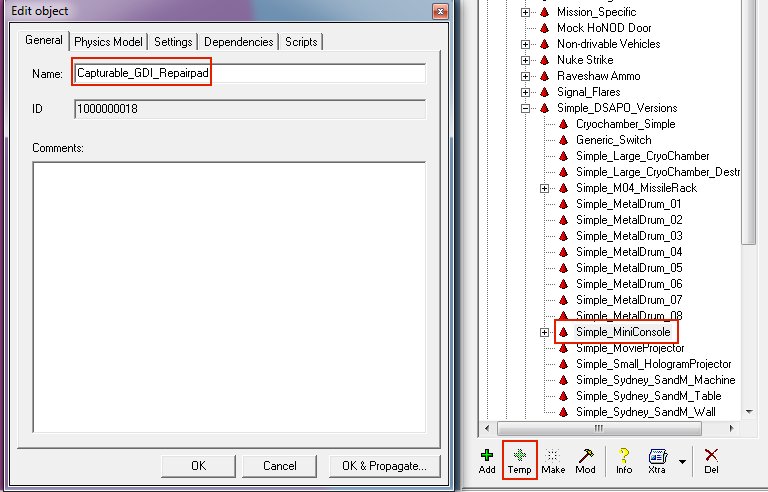
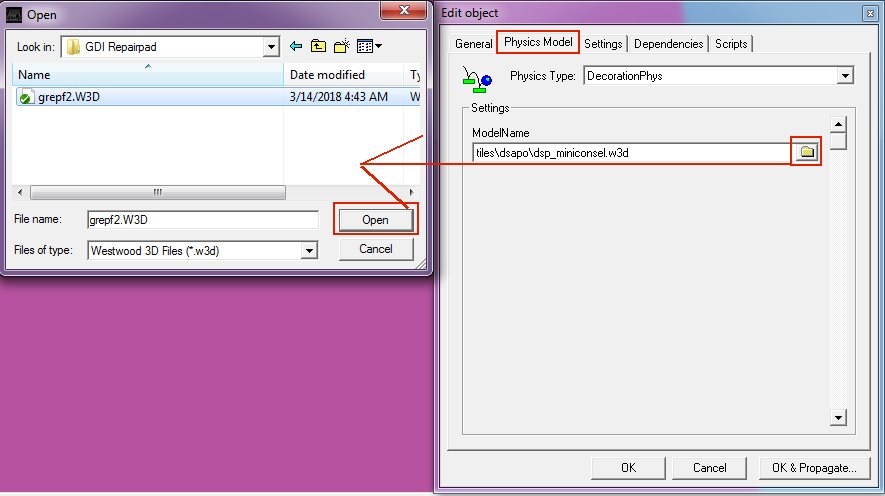
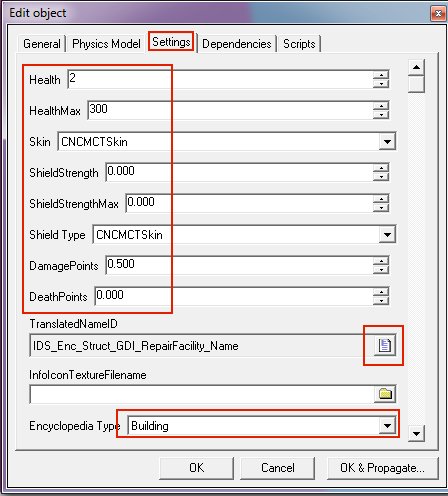
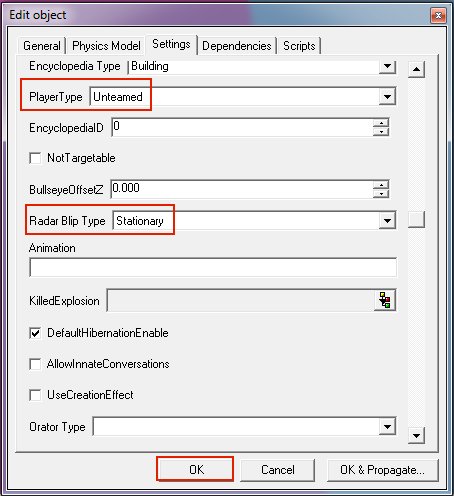
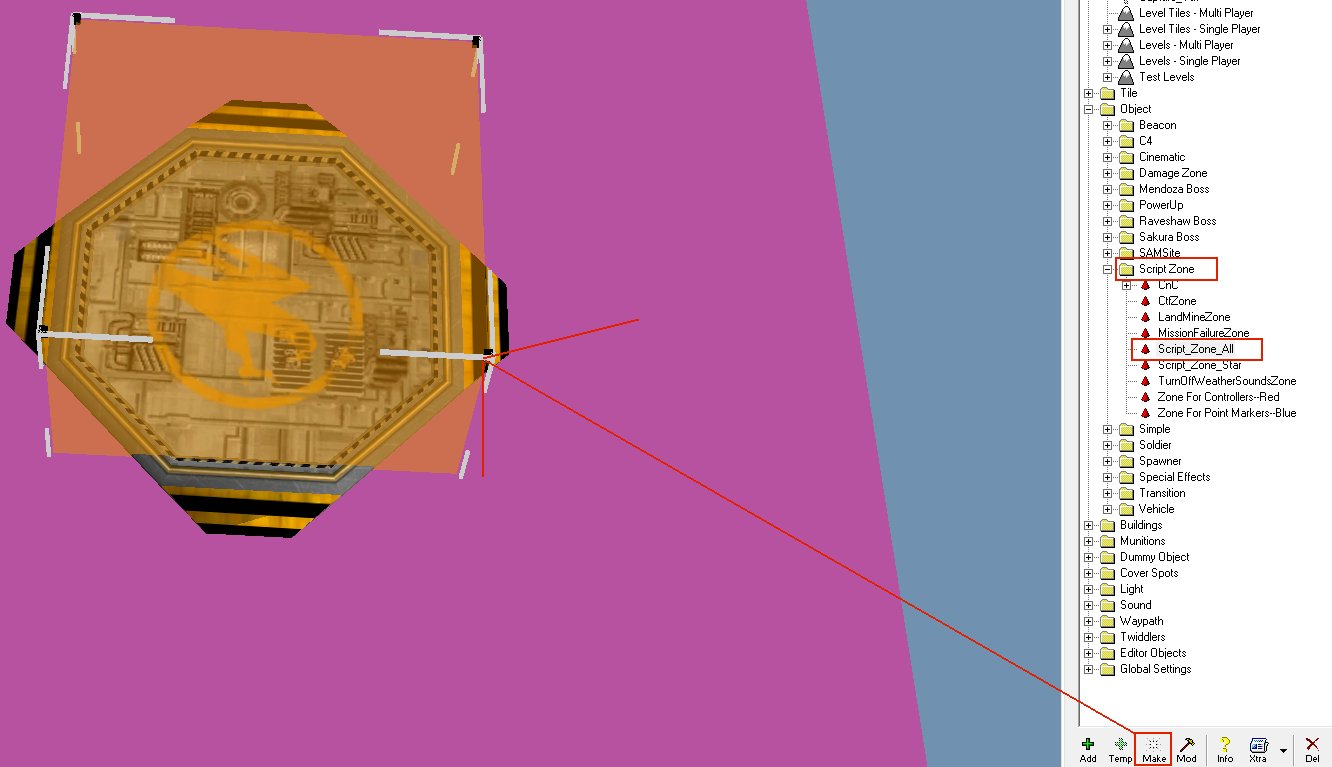
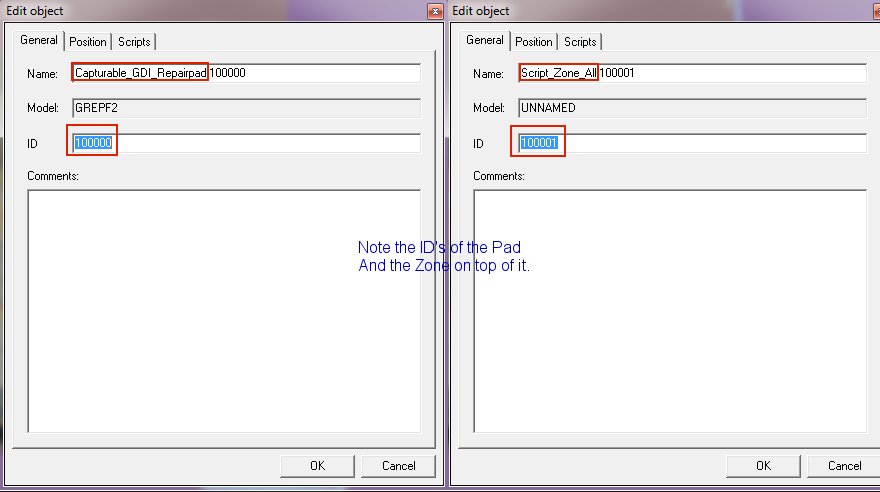
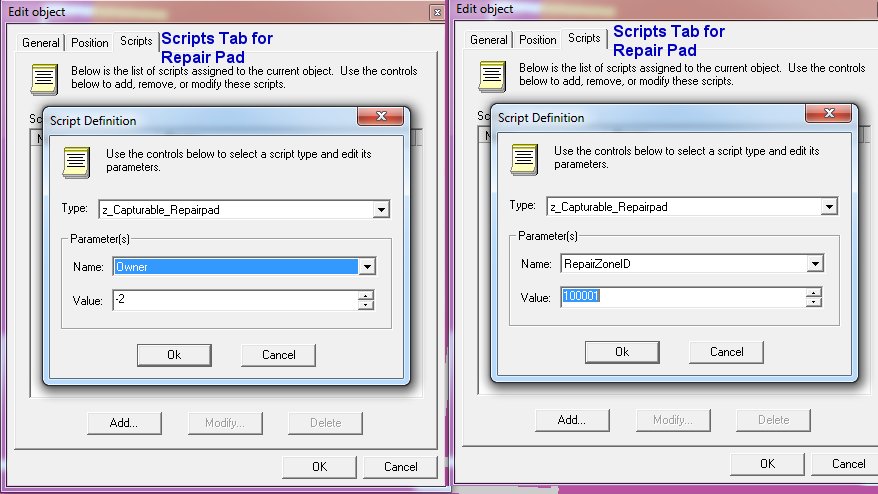
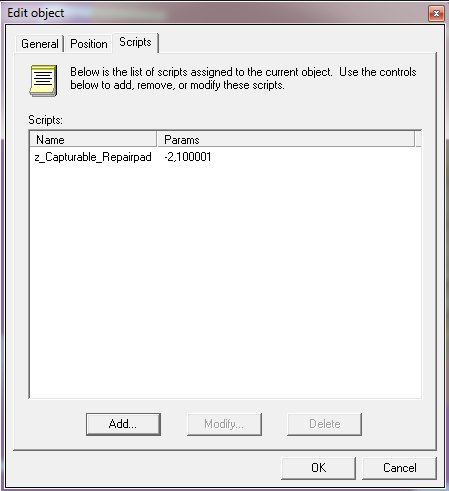
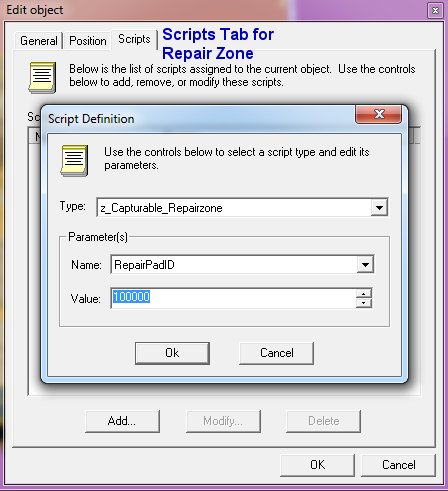
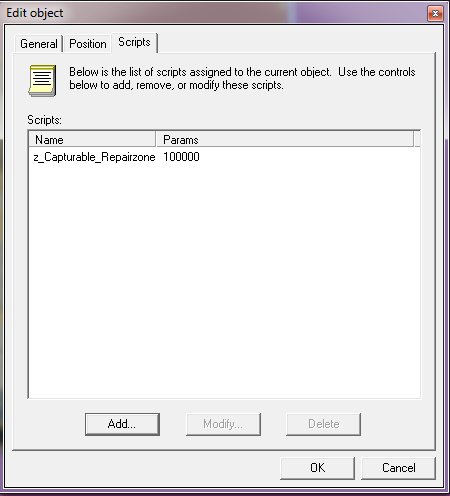
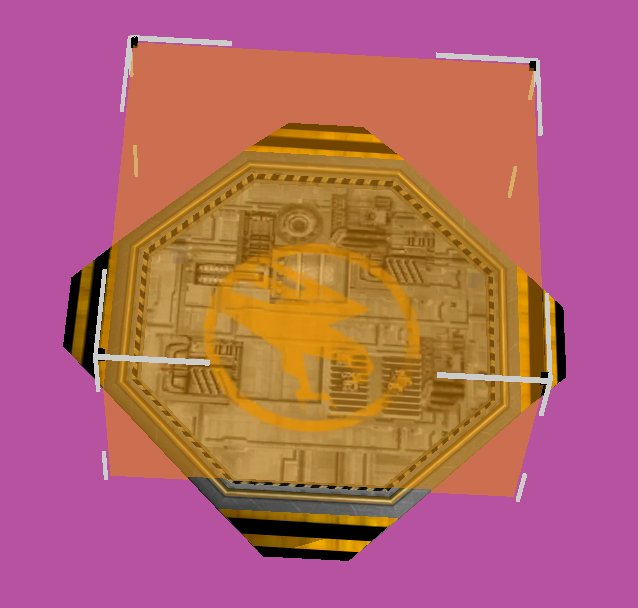
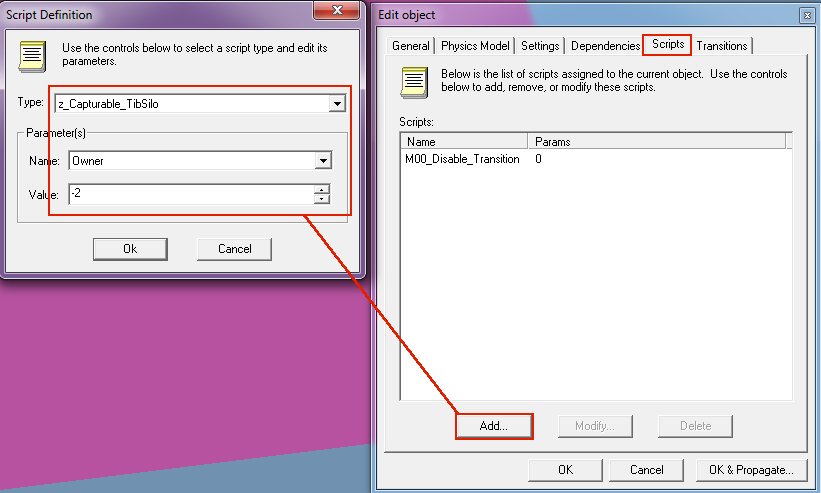
The Repair Pad models and its textures you are gonna need are in the zip: CapturableRepairpads.zip Temp it under Object->Simple->Simple_DSAPO_Versions->Simple_MiniConsole and name it "Capturable_GDI_Repairpad": On the Physics tab browse for the model by clicking the folder icon and open it: Give it 2 Health, 300 MaxHealth (Shield & ShieldMax should be 0.000) Give it CNCMCTSkin as Skin and Shield Type (even if its set to 0.000) Click the letter icon for TranslatedNameID and go into the Enc category and find the RepairFacility one as shown below Make the Encyclopedia Type a Building Still on the Settings tab set PlayerType to Unteamed and Radar Blip Type to Stationary Now you can "MAKE" it on your map: Next goto Object->Script Zone->Script_Zone_All and MAKE it, position it on top of the repairpad as seen on the image below. To make it higher in length hold down SHIFT and then move your mouse up/down by selecting the black little boxes of the zone. Now get to the properties of the Repairpad and note its ID, in this example 100000 Get to the zone properties too and get its ID, in this case 100001 Goto the properties of the Repair Pad and its Scripts Tab, there you add the script z_Capturable_Repairpad with the Name parameter of Owner set to -2 (unteamed) Set the Name parameter RepairZoneID to the ID of the Zone you noted in the step earlier, which in this example is 100001 Endresult should look like this for the repair pad: Now edit the Script_Zone_All that you placed on top of your Repairpad by going to its properties and on the scripts tab add the script "z_Capturable_Repairzone" and set the Name parameter for RepairPadID to the ID you noted earlier for the Repairpad, in this example it is 100000 Endresult for the zone should look simular to this: Now save your level and you will have a capturable repair pad on your map! Repeat the above process for Nod but then with the Nod model of course.

-
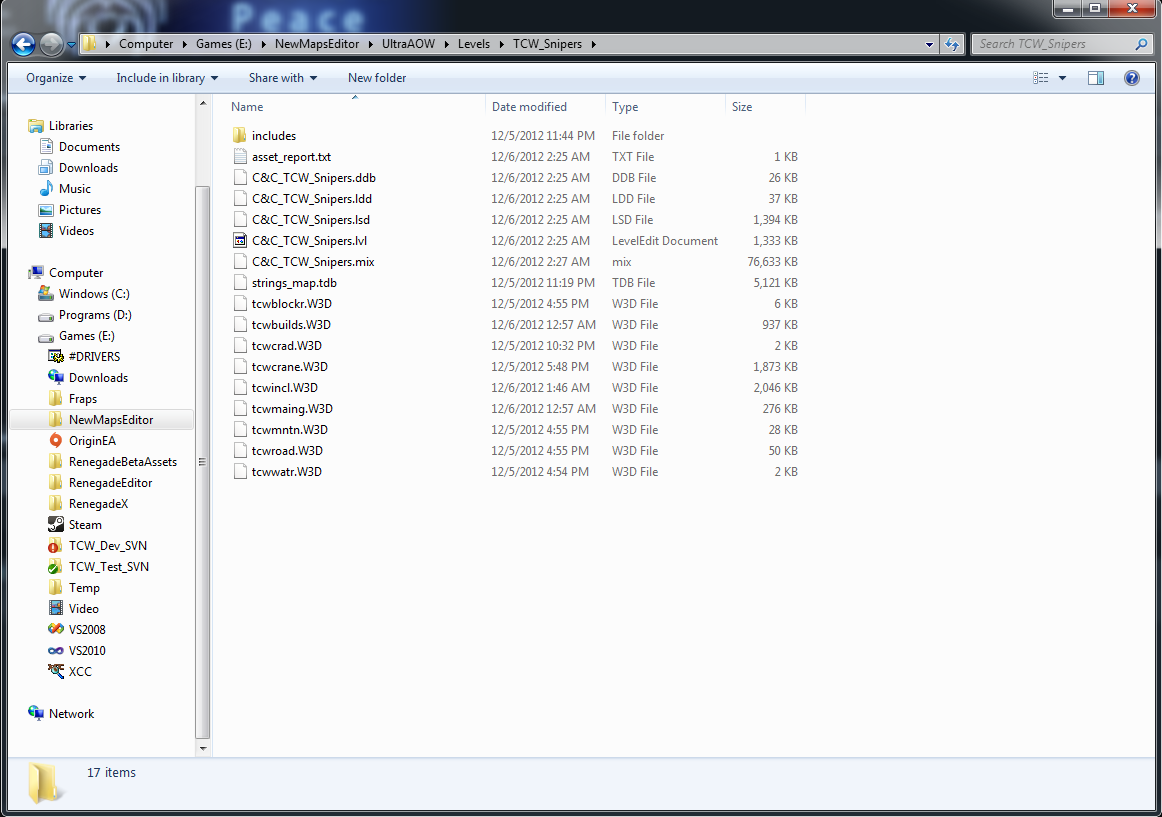
Ok this is how I do it: I create a folder inside \Levels\ called with my mapname for example TCW_Snipers Inside this folder i place my terrain W3D's which i export from 3DSMax8, the strings_map.tdb for custom translations and the .lvl file(s) when i save the map in there as C&C_TCW_Snipers.lvl, i also have a folder called 'includes' in there which contains ALL other files i use in the map, wav's, tga's, dds's and mp3's, i do that so i know which files should go into my mix file when the map is done. The EditorCache folder contains ALL the textures i use on my map(s) ie all the tga's and dds's. The wav's and mp3's don't have to go there. I make my mix's manually. Simply put: Just copy C&C_Field.mix from your Renegade Data folder to your Level folder and rename it to C&C_Mymap.mix. Then open your C&C_Mymap.mix with XCC mixer (double click on it to open a mix) delete ALL the C&C_Field files from it so you end up with a empty file. Next you drag and drop in ALL the files from your 'includes' into the XCC window, the .lsd .ldd and .ddb and strings_map.tdb from your level folder as well and finally the W3D's that make up your terrain. Your mix file is now ready and can be used on the game If you have questions let's see them here is XCC mixer: http://multiplayerforums.com/index.php?/files/file/77-xcc-mixer/ Here some ss's from my folders to give you a little insight how i arrange it all:
-
ALWAYS are the files loaded fromt he always.dbs and .dat like the armor settings and warheads, you cannot modifiy these in a map, only in a mod. Characters, im not sure... EditorCache is where you put your tga and dds textures (in ADDITTION to your level file folder) so they show up when you load your map. presets is where the editor stores the presets that are available ingame and your temps(custom presets for maps) note you can ONLY temp stuff when making a map
-
The files you need for this tutorial: Capturable_Silo.zip In this tutorial we will make the Capturable Tiberium Silo's as seen on some of my maps like Mediterranean, Blaat and Air, and some others. The Tiberium Silo when destroyed can be repaired back to full health and will give the team credits that captured(repaired) it. A GDI player can capture(repair) a Nod Tiberium Silo and vice versa. First we need our map of course, you must export it form RenX or 3DSMax as a W3D and place it in your Editor\Levels\Mapname\filename.W3D I am assuming you did that already. In this example i named the folder inside my Levels "CaptureTut" and inside that folder i have my map "captuto.W3D" which i exported from 3DSMax8 (file is included in the zip). Ok so let's open our Editor now, and take note of the following screenshot and follow the text below. First thing we do is Expand (1)"Terrain", and click the button (2)"Temp" at the bottom right of your Editor. A window pops up referred to as First Screen on the General Tab there (3)enter a mapname, not that the mapname must be 100% unique in the entire preset-tree so name it wisely or it won't work properly. Then (4 & 5)click on Settings tab, now we goto the Second Screen with the Settings Tab and we (6)click the Folder button and browse for our Levels\MapName\filename.W3D(your map's W3D export), and finally we (7)OK it. The preset should appear in the list now at the top right under the Terrain. Like on the following screenshot: Ok, next, the Tiberium Silo's and Repair Pads are not "REAL" buildings, they are setup as "VEHICLES" and they do not count toward the buildings at all, in other words: It is not required to destroy them to win the game. I remember endlessly long battles between silo's and pads its not even funny anymore This will eliminate that. So, now we goto (1)expand Object then (2)expand Vehicle then (3)expand Mounted and finally we (4)select the GDI_Guard_Tower and then (5)press the "TEMP" button again at the bottom right. Now we (1)enter the name of our preset and call it "GDI_Tiberium_Silo", then (2)click on the Physical Model tab. We leave the setting DecorationPhys in place this is correct already. All we do is (1)click the folder button and browse for our Levels\Mapname\gtsilo.W3D and select it. Next we goto the Settings tab, make sure you put PlayerType to GDI (or Nod if this is for the Nod Silo) Then scroll down a little further until you see the WeaponDefID option. We have to set this to "None". (1)Click on the colorful button, then a new window pops up with Weapon names, goto the top and (2)select None, then (3)press OK. So it looks like this, with the WeaponDefID EMPTY completely: Next we goto the Scripts tab. (1)Click on the "Add" button and then on the dropdown goto the script and select it (2)z_Capturable_TibSilo and for the parameter name "Owner" we (3)enter 1 for GDI (0 is for Nod). Now OK everything and you should end up with the GDI_Tiberium_Silo added under the GDI_Guard_Tower like the following: Now just click the (1)"MAKE" button to have the Silo appear on your map like so: Repeat the above to create the Nod_Tiberium_Silo but then set the Team to Nod and the Physical Model to the W3D for the nod tibsilo. I will write the tutorial for the Repair Pads tomorrow and also how to properly translate it ingame so it shows the name "Tiberium Silo" on it, it's getting late here
-
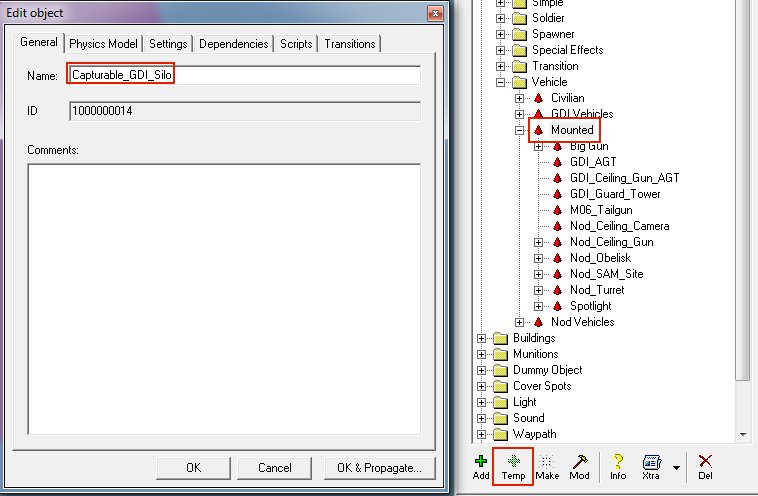
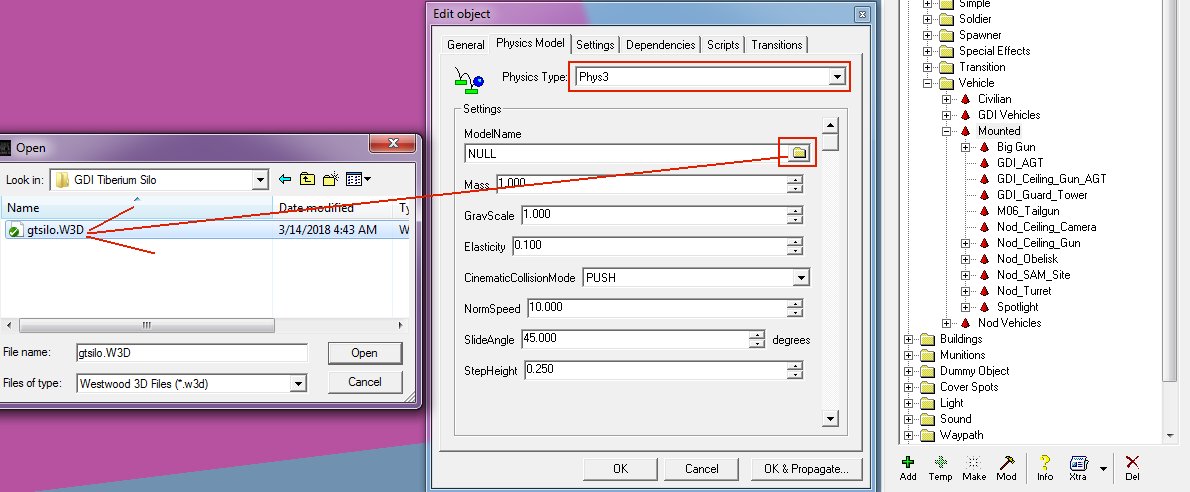
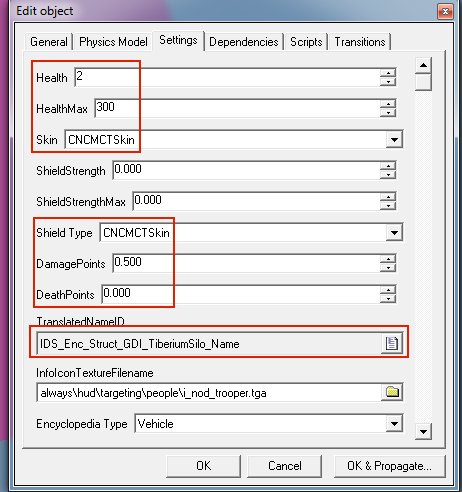
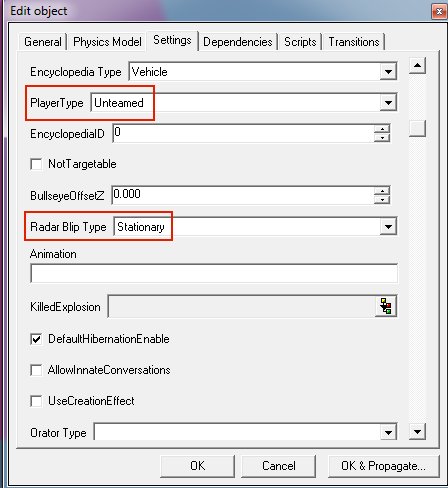
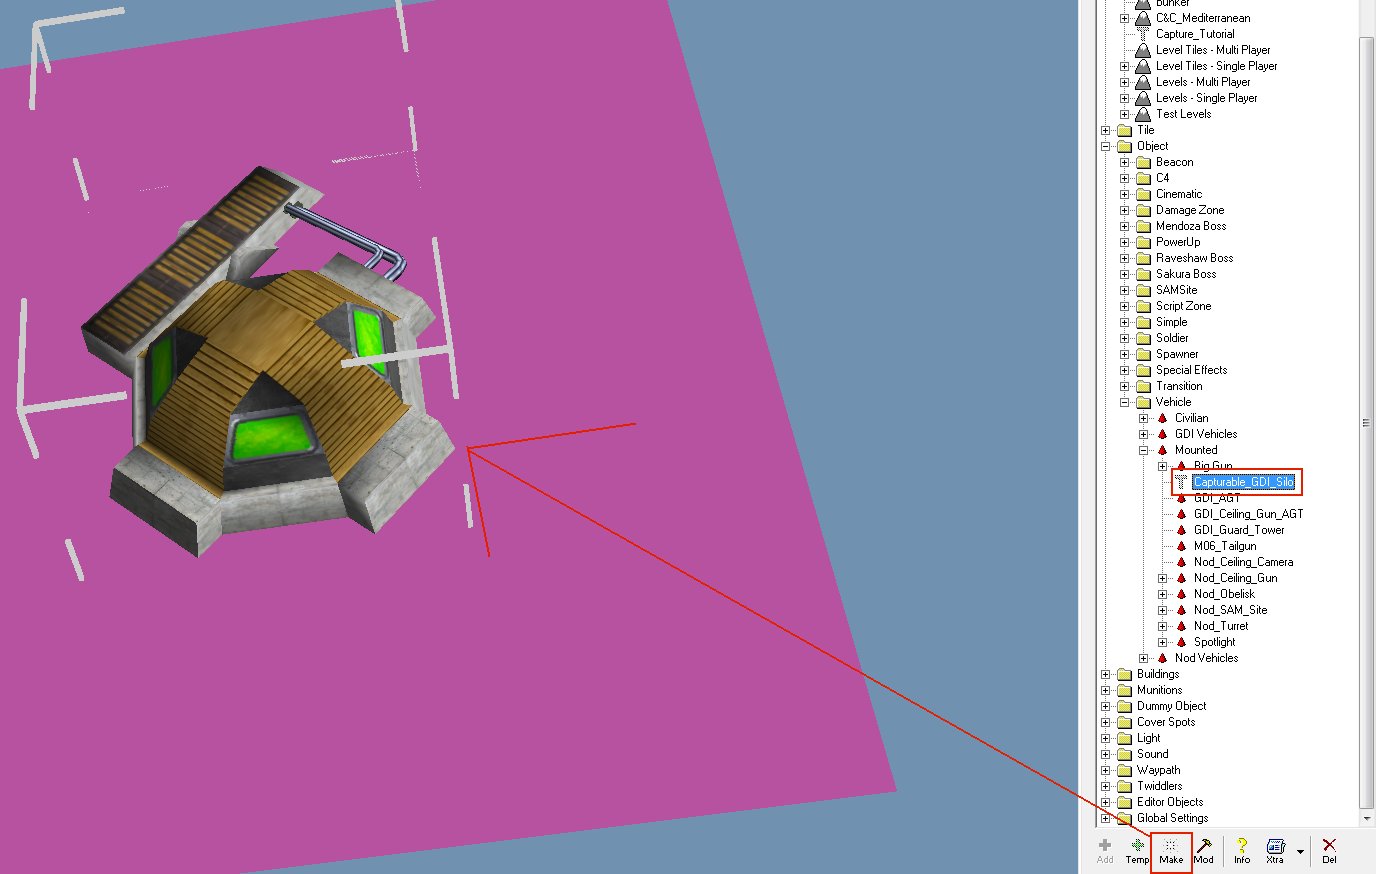
Required Files: CapturableTiberiumSilos.zip TEMP a preset into Object->Vehicle->Mounted and call it for example "Capturable_GDI_Silo": Goto the Physics Model tab and for ModelName click the folder button and browse for the gtsilo.W3D file, click Open: Goto the Settings tab and set Health to 2 and Healthmax to 300 (yes: ShieldStrength and Max should be 0.000) Set Skin to CNCMCTSkin and Shield Type to CNCMCTSkin Set DamagePoints to 0.500 and Deathpoints to 0.000 Set the TranslatedNameID to IDC_Enc_Struct_GDI_TiberiumSilo_Name (found in the strings editor under the Enc category) Still on the Settings tab set PlayerType to Unteamed Radar Blip Type should be Stationary Goto the Scripts tab and click Add... for Type browse for the z_Capturable_TibSilo For Name parameter Owner we set the Value to -2 (which means unteamed). Now select your temped preset called Capturable_GDI_Silo and click on "Make" button. It will appear on your map. Save your level and make your mix file. Now people can play your map and capture the silo. Repeat the above process for the Nod Tiberium Silo but set Team to Nod, that's all. Greetz zunnie
-
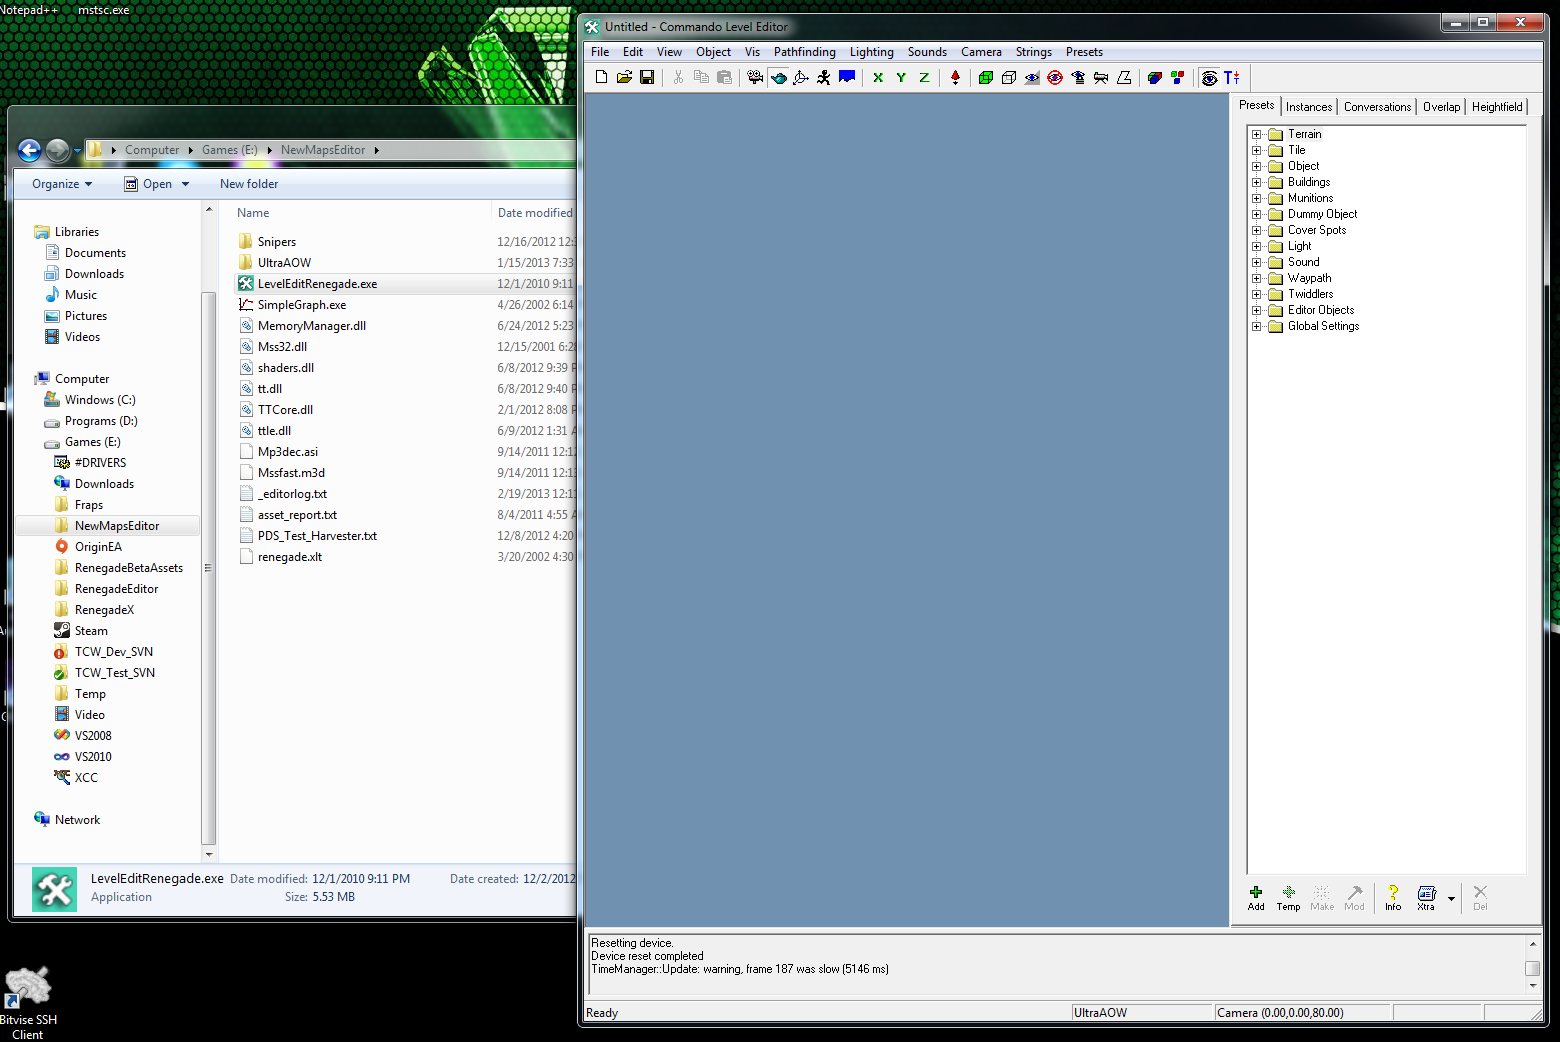
If it didnt work then the preset list at the right, the folders, dont all have a [+] in front of them which should happen. (or at lest 95% of them) Show a screenshots of your leveleditor and we can tell right away if its correct or not It should look like this:
-
Version 1.0
801 downloads
This file is for fixing the Direct3D Error under 64Bit Windows OS, when trying to load DDS files in max. Unpack the dds.bmi file into: Autodesk/3dsMax8/plugins/ Restart 3DS Max if it is running, and that error will disappear. This fix is known to work for Vista 64-bit, and Windows 7 64-bit. -
Version 1.16
345 downloads
This nifty tool lets you reimport models from the W3D file back into Max, for you own editing needs Extract into your 3dsmax8 Folder to install **Now that you have the model it still needs to be optimized for Rengade, as the importer messes with the W3D file, Please read the tutorial on the subject Here is the "Importing and Optimizing W3D's Tutorial" - using this script to import -
It is online right now and serving a CoD4 and CSGO 32 player server Server IP = 95.211.223.6 Both the CoD4 and CSGO server are running on the default port so you do not need to enter them when trying to connect. Have fun!
-
-
Then i don't really know what could be wrong :|
-
Tiberium Crystal War Dev Night 10 February 2013 @ 4PM
zunnie replied to zunnie's topic in Community News
Ah well shit.mp3 We'll schedule another devnight soon -
In your MPF Games\Tiberium Crystal War\Updates is a dotNetFx40_Full_setup.exe did you install that? (it actually lacunhes when you install tcw but maybe you thought it wasnt needed) Did you install that?
-
Tiberium Crystal War Dev Night 10 February 2013 @ 4PM
zunnie replied to zunnie's topic in Community News
It starts in less than an hour (i'm already ingame) all join -
Hit me up on IRC or TS3 later today, i'll teamview and help you do it
-
-
Original Authors: Bumpaneer, StoneRook and Andre First step, I’d like to give big thanks for Bumpaneer on allowing me to write this tutorial on realistic water making for Renegade. Well, let’s get started. Load your Ren-X and make a plane 10x10 or bigger. Remember this is only to get you started, once you learn this tutorial, you will be able to make the water any size you wish. Press the M key on your keyboard, which should open the Renegade Material Editor. Click on the blue box icon (Make New Renegade Material) to avoid conflicts between a material already used in other object. Then, change the Pass Count to 2 and select the Surface Type (Naturally Water) as show in the picture below: Usually, when you start by the Pass 1 tab, Ren-X crashes, so let’s move on to Pass 2 tab, then we come back to set up the #1.Click on Vertex Material tab on Pass 2. Make sure Ambient, Diffuse, Specular and Emissive colors are black. Under the "Stage 0 Mapping" (bottom Left of screen). Select the drop down box to the right of Type and select "BumpEnv". And fill the box Args below with: BumpScale=0.2 BumpRotation=0.3 VPerSec=-0.01 And don’t forget to change the Stage 1 Mapping Type to Environment (Basically to make it reflective) as shown in the picture below: Now let’s move to the Shader tab (Still inside Pass 2 Tab). Select the Blend Mode to Add. On the Advanced (Still on Shader Tab, but on bottom), select the Pri Gradient as Bump-Environment and the Detail Color as Add. Watch picture below: Now let’s move to the Textures tab to set up the textures and the details of the water and it’s movement. Check the Stage 0 Texture and click on the None button to select the proper texture. Use the texture called bump_water.tga here. Now check the Stage 1 Texture (Detail Texture) and click again on None button and select the texture named water_reflect.tgaOn next page you are going to see how your Textures tab should be after setting up all these changes. Once you are done with setting up Vertex Material, Shader and Texture tabs on Pass 2, click on the button shown on the picture (Assign Material to Selection) to apply the changes to rhe object. Now let’s move back to Pass 1. On Vertex Material Tab, change the Stage 0 Mapping Type to Linear Offset and add VPerSec=-0.01 to the Args box, as shown in the picture on next page.Important Note: The Ambient, Diffuse, Specular and Emissive are already set up properly, you don’t need to change them. There is nothing to change or set up on Shader Tab, so let’s move directly to the Textures Tab on Pass 1. Check the Stage 0 Texturing and select the remaining texture included in the pack:water_texture.tga – Once you select the texture, check the Display button and then, to finish, click once again on Assign Material to Selection button, wich will Finished Product: Tutorial Written by André. Realistic Water technique developed and improved by Bumpaneer and StoneRook. If you wish to know how to make more realistic effects for Renegade, start using WDump provided with the Renegade Mod Tools, there you can view all W3D’s Textures settings, making you be able to duplicate any effect Westwood added to their maps with textures. == Enjoy Your New Realistic Water ==
-
I'll be there for sure (99.9%)
-
Tiberium Crystal War Developer Night Amsterdam (Netherlands) Sunday, 10 February 2013, 16:00:00 CET UTC+1 hour Calgary (Canada - Alberta) Sunday, 10 February 2013, 08:00:00 MST UTC-7 hours New York (U.S.A. - New York) Sunday, 10 February 2013, 10:00:00 EST UTC-5 hours London (United Kingdom - England) Sunday, 10 February 2013, 15:00:00 GMT UTC Paris (France) Sunday, 10 February 2013, 16:00:00 CET UTC+1 hour Moscow (Russia) Sunday, 10 February 2013, 19:00:00 MSK UTC+4 hours Sydney (Australia - New South Wales) Monday, 11 February 2013, 02:00:00 EDT UTC+11 hours Beijing (China) Sunday, 10 February 2013, 23:00:00 CST UTC+8 hours New Plymouth (New Zealand) Monday, 11 February 2013, 04:00:00 NZDT UTC+13 hours Introduction Hello everyone i would like to announce that we are going to hold a new gaming event for Tiberium Crystal War. Most, if not all, of our Developers and Testers will be available during this event so you can ask questions and or make comments about the current version 1.52 and the upcoming version 2.0 which is under construction. Newcomers If you are a newcomer to Tiberium Crystal War or never heared of it, go watch our video trailer first. Tiberium Crystal War is a full standalone conversion of the Renegade W3D Engine, you do not need Renegade to play it and you can run it aside Renegade just fine. It consists of structures, vehicles, units, sounds and many other assets from the game C&C 3: Tiberium Wars which were worked up by our Developers to work with Renegade. There are 15+ maps and a few different game-modes such as the classic All Out War, Deathmatch, Co-Op and Domination. If you want you can look at our guides: n00b guide & Official Manual Where You can download the Tiberium Crystal War v1.52 client from our website at http://www.tiberiumcrystalwar.com There are several mirrors available and all are hosted on 100mbits connections. Thanks & Have fun Thank you all for reading this and maybe joining up in this event, we haven't held any events for a while so we hope to see many people join up and have some good old fun. Greetz the Tiberium Crystal War Development Team TiberiumCrystalWar.com